RecyclerView is a like a ListView in Android apps with better performance. It recycles the items that are already used for the upcoming items, so it takes much less RAM and is also faster.
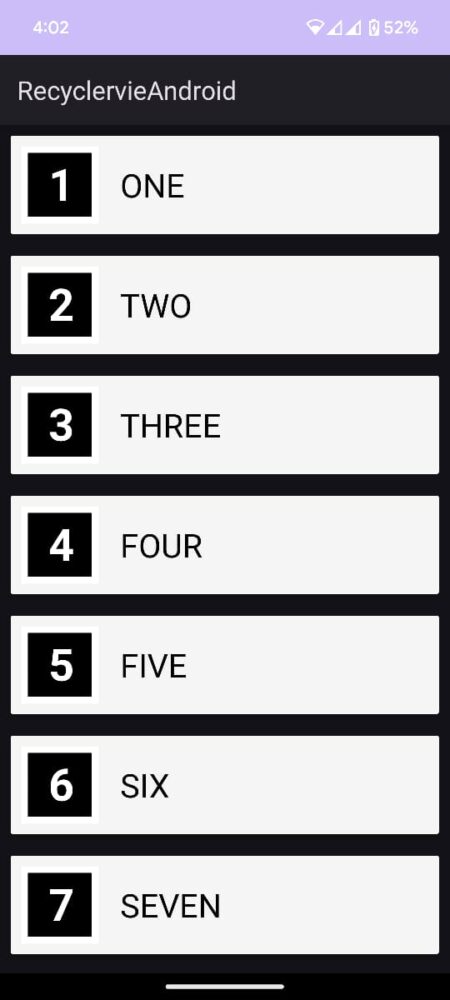
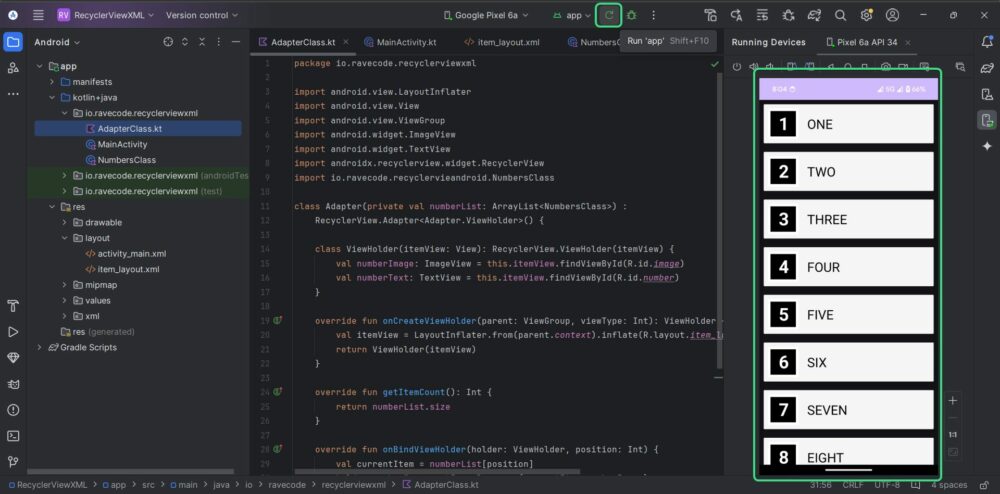
We will create a simple Numbers app showing the number image and name of each item of the RecyclerView. Here’s how the final app will look.
Now let’s create the app.
1. Create the app in Android Studio
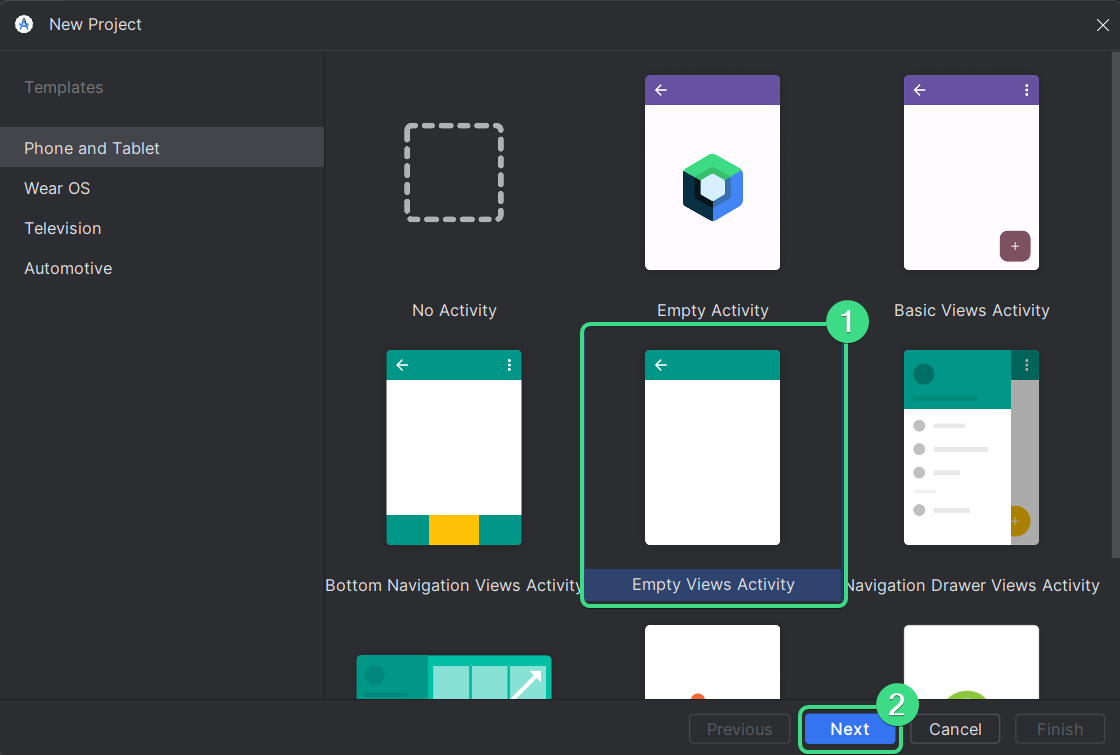
Open Android Studio and create a new project. Select “Empty View Activity” and then click on “Next”.
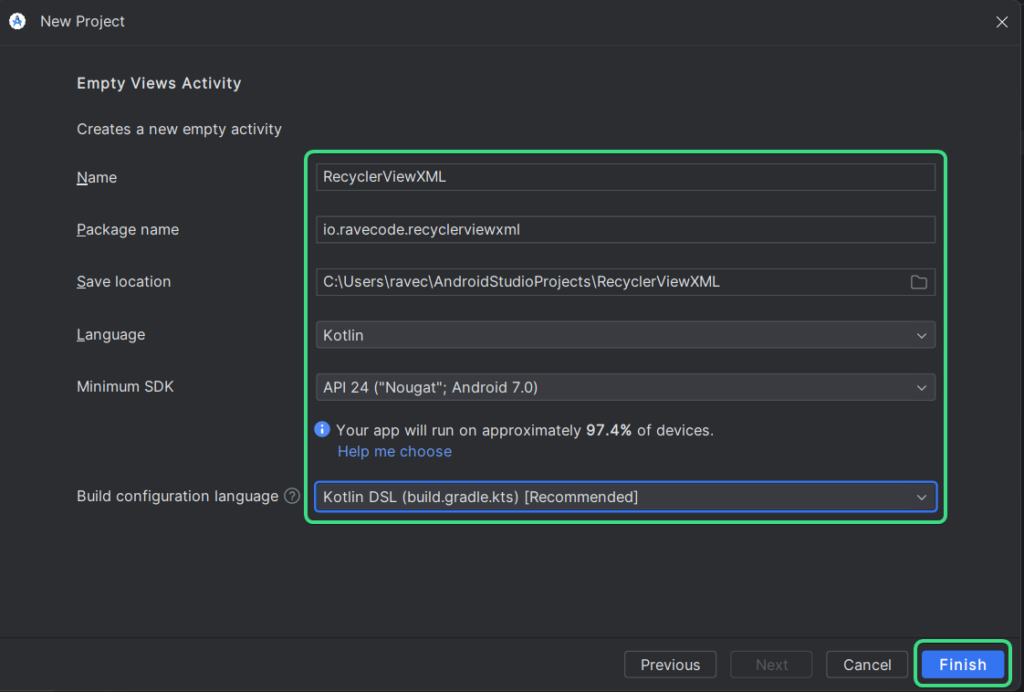
Here are the configurations we will be using for the app. After setting your app’s configurations, click on the “Finish” button.
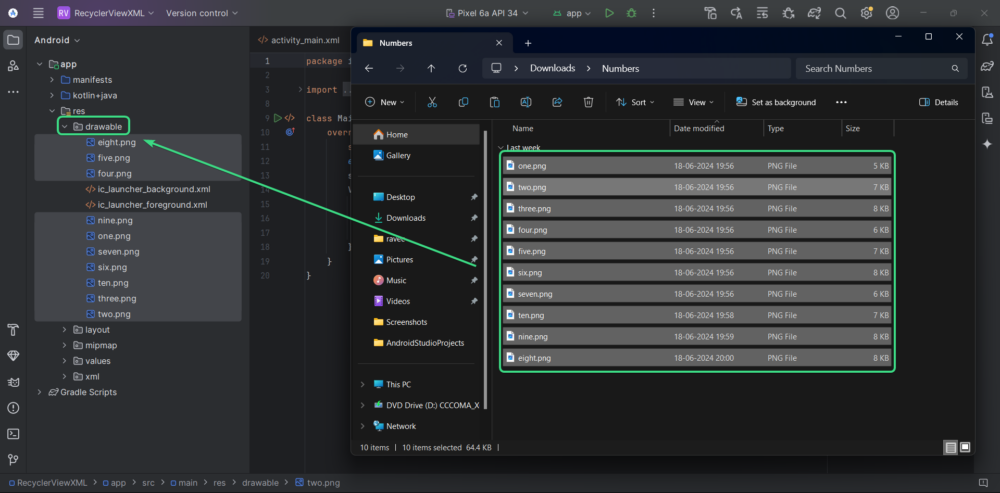
2. Import the images to your drawable folder
Now, we need to import the image of the numbers into the “drawable” folder in the “res” folder. We will show these images in each item of RecyclerView.
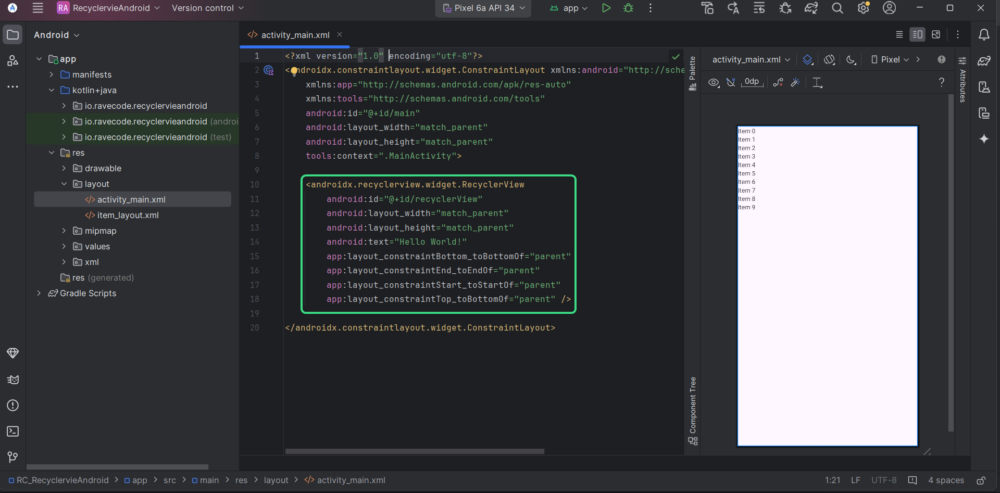
3. Add RecyclerView to activity_main.xml
Add the RecyclerView layout to your activity main wherever you wish. Make sure to give your RecyclerView an ID.
    <androidx.recyclerview.widget.RecyclerView
        android:id="@+id/recyclerView"
        android:layout_width="match_parent"
        android:layout_height="match_parent"
        android:text="Hello World!"
        app:layout_constraintBottom_toBottomOf="parent"
        app:layout_constraintEnd_toEndOf="parent"
        app:layout_constraintStart_toStartOf="parent"
        app:layout_constraintTop_toBottomOf="parent" />
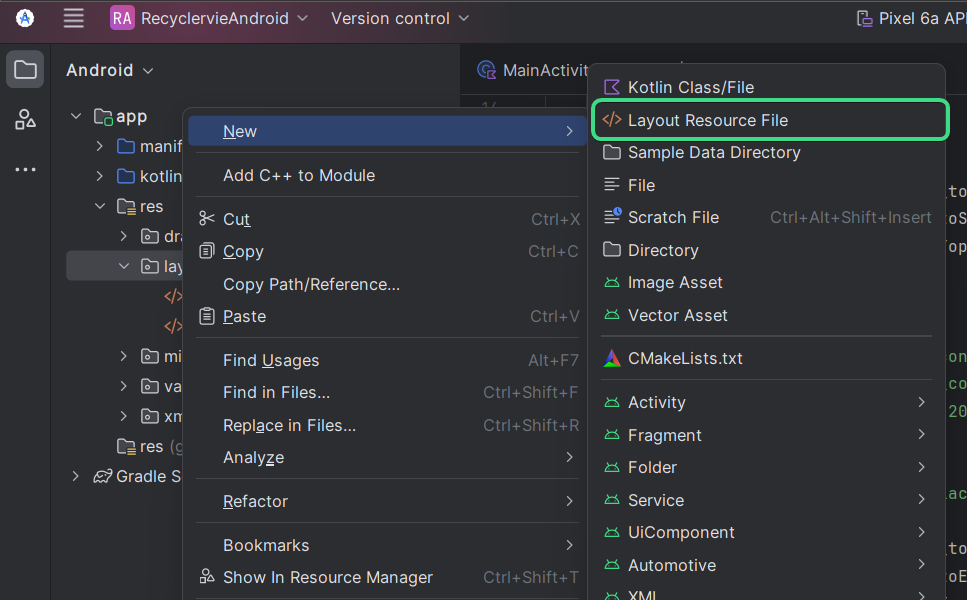
4. Designing each item of RecyclerView
Now we need to create a template in XML that will work like a template for the items of our RecyclerView. In the backend, we will replace the views with our content.
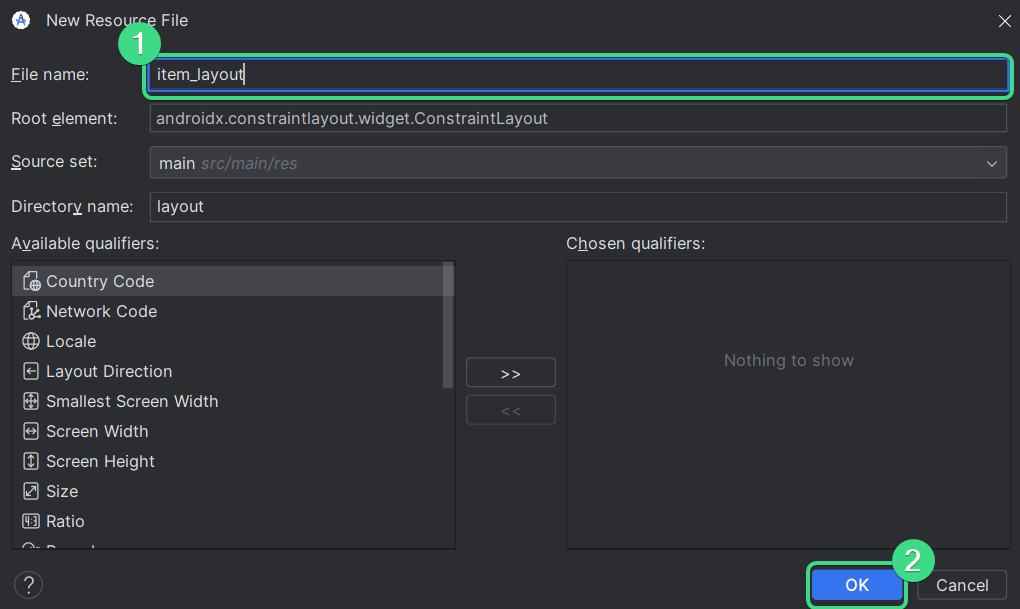
To create the layout, right-click on your layouts folder and click on “New” and then select “Layout Resource File”.
Give your layout a name and click on “OK”.
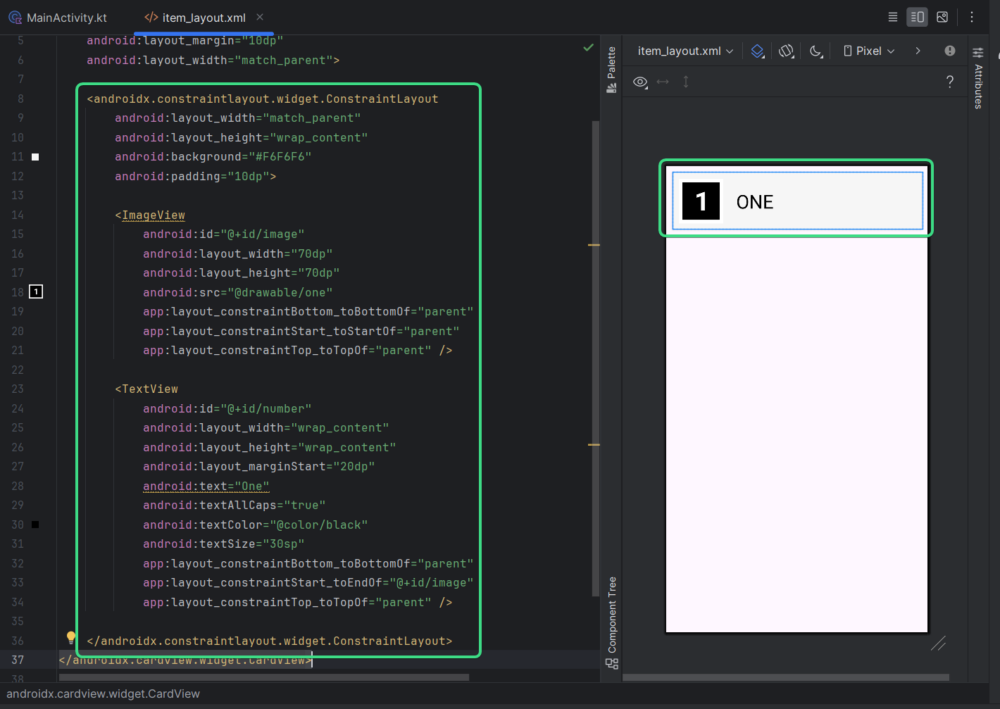
Here is the code for the simple layout we will use.
<androidx.cardview.widget.CardView xmlns:android="http://schemas.android.com/apk/res/android"
    xmlns:app="http://schemas.android.com/apk/res-auto"
    android:layout_height="wrap_content"
    android:layout_margin="10dp"
    android:layout_width="match_parent">

    <androidx.constraintlayout.widget.ConstraintLayout
        android:layout_width="match_parent"
        android:layout_height="wrap_content"
        android:background="#F6F6F6"
        android:padding="10dp">

        <ImageView
            android:id="@+id/image"
            android:layout_width="70dp"
            android:layout_height="70dp"
            android:src="@drawable/one"
            app:layout_constraintBottom_toBottomOf="parent"
            app:layout_constraintStart_toStartOf="parent"
            app:layout_constraintTop_toTopOf="parent" />

        <TextView
            android:id="@+id/number"
            android:layout_width="wrap_content"
            android:layout_height="wrap_content"
            android:layout_marginStart="20dp"
            android:text="One"
            android:textAllCaps="true"
            android:textColor="@color/black"
            android:textSize="30sp"
            app:layout_constraintBottom_toBottomOf="parent"
            app:layout_constraintStart_toEndOf="@+id/image"
            app:layout_constraintTop_toTopOf="parent" />

    </androidx.constraintlayout.widget.ConstraintLayout>
</androidx.cardview.widget.CardView>
5. Create a data class for the item
Now we need to create a Data class for the data we will be using in our items.
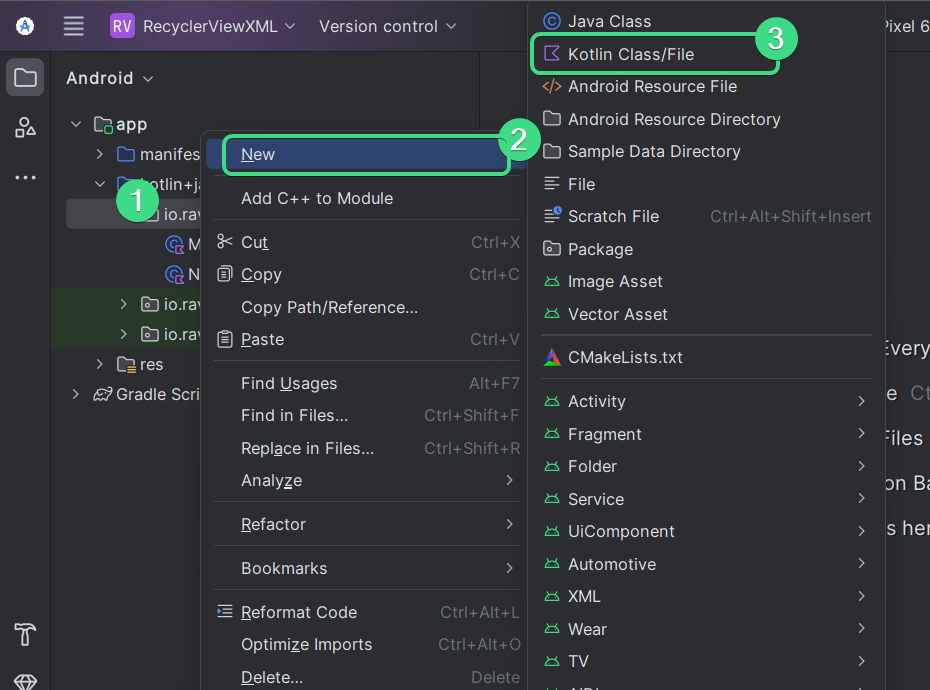
To create the data class, right-click on your package name and select “New” -> “Kotlin Class/File”.
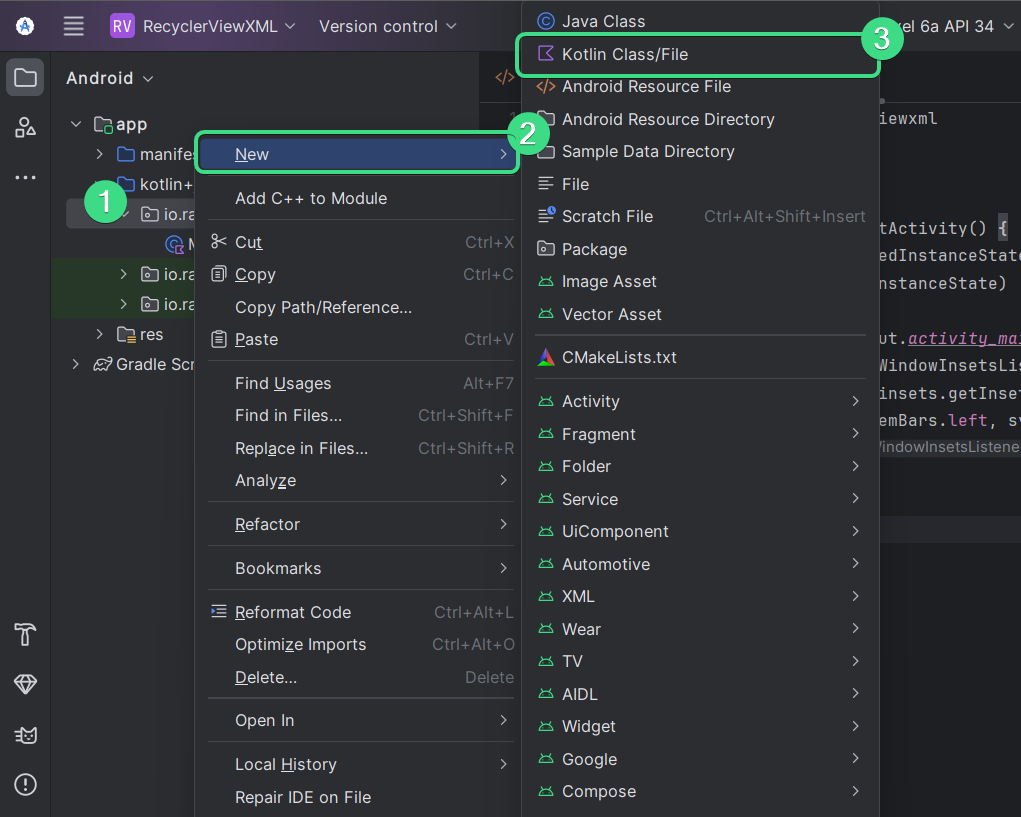
We want to create a Data class, so select the “Data class” option and give the file a name.
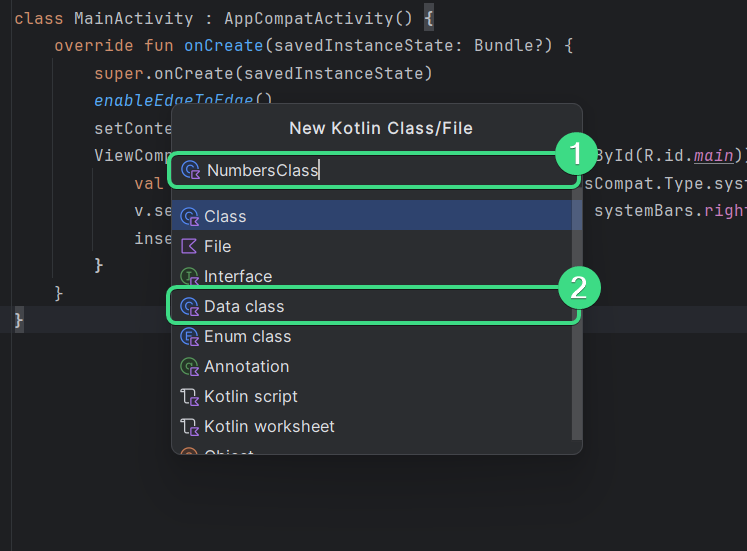
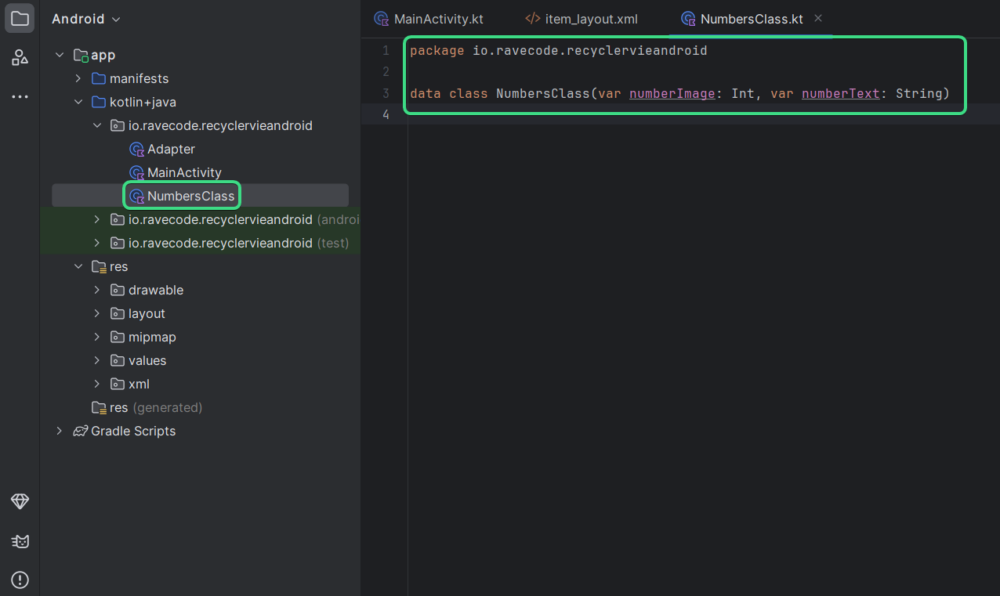
Now data class will hold names and images as these are two data streams, we want to show in each item of the RecyclerView.
data class NumbersClass(var numberImage: Int, var numberText: String)
6. Create the RecyclerView Adapter
The RecyclerView Adapter let’s select the RecyclerView layout, connect the data with the views, and more.
To create the Adapter class, create a new Kotlin File by right-clicking the package name.
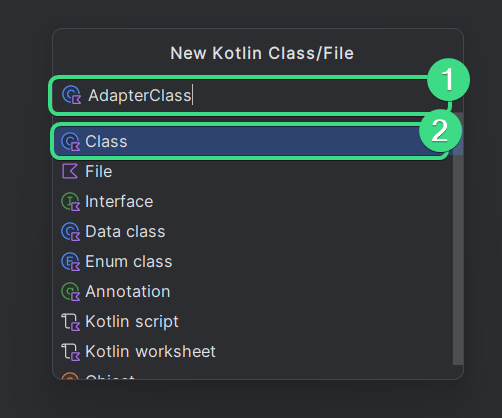
Give your adapter class a name and select “Class”.
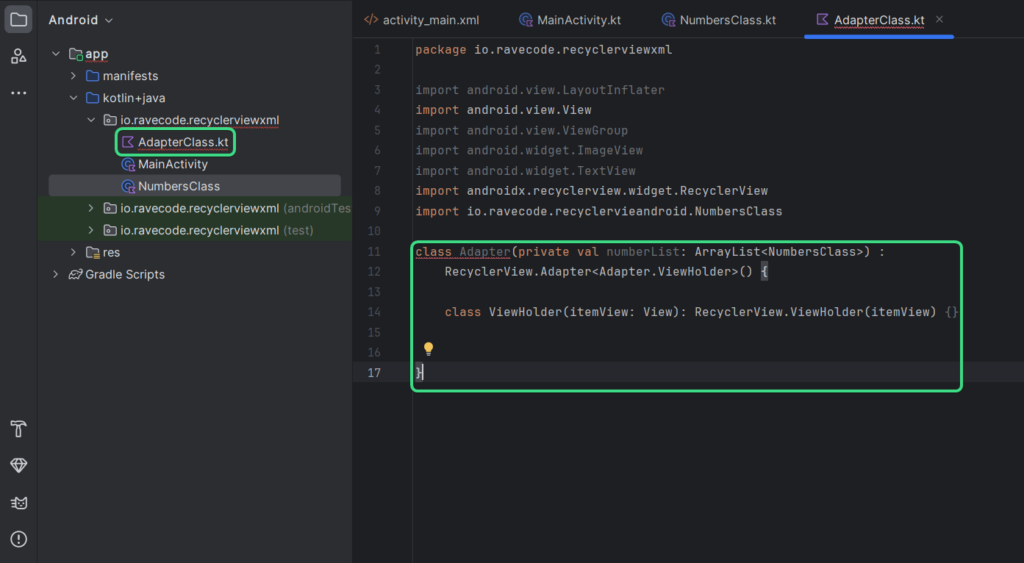
Create an Adapter class with a viewHolder with the following code. We use the ViewHolder to select the views of the item layout for RecyclerView.
class Adapter(private val numberList: ArrayList<NumbersClass>) :
    RecyclerView.Adapter<Adapter.ViewHolder>() {

    class ViewHolder(itemView: View): RecyclerView.ViewHolder(itemView) {
    }
}
Here, we will initialize the views for the RecyclerView from item_layout.xml
val numberImage: ImageView = this.itemView.findViewById(R.id.image)
        val numberText: TextView = this.itemView.findViewById(R.id.number)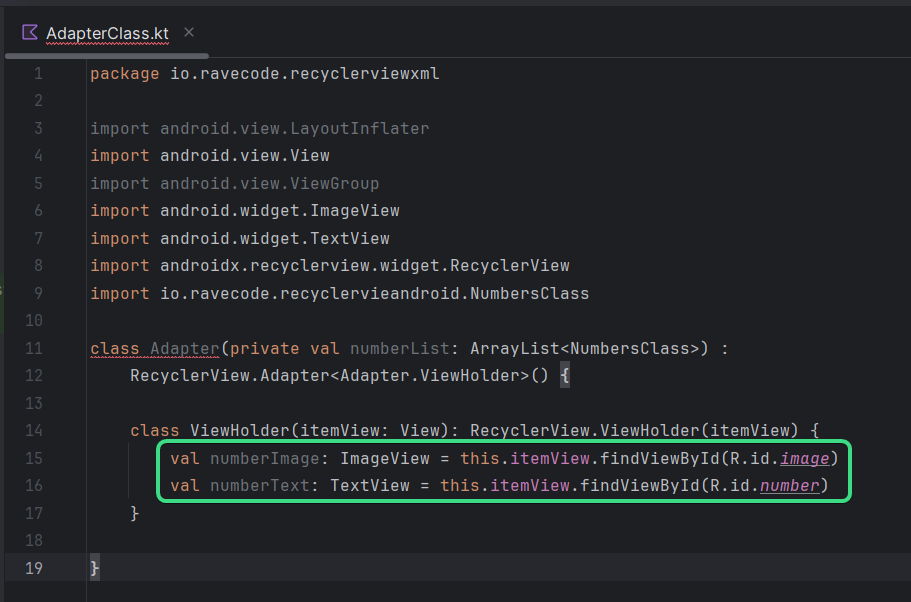
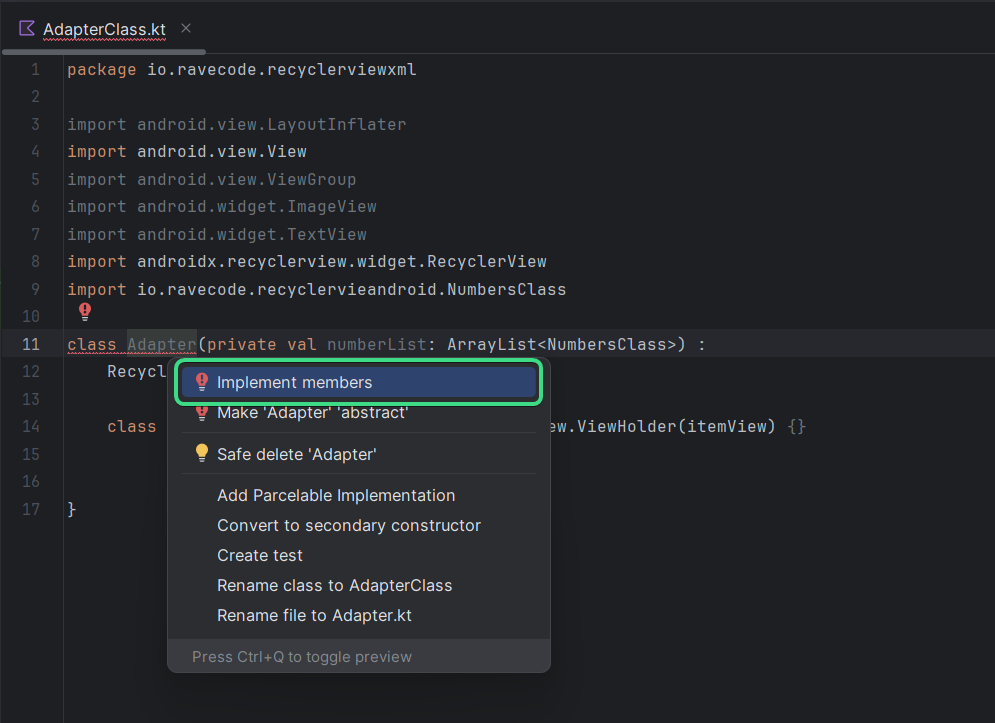
Now we will implement all the necessary functions of the Adapter. Click Alt+Enter and select “Implement members”.
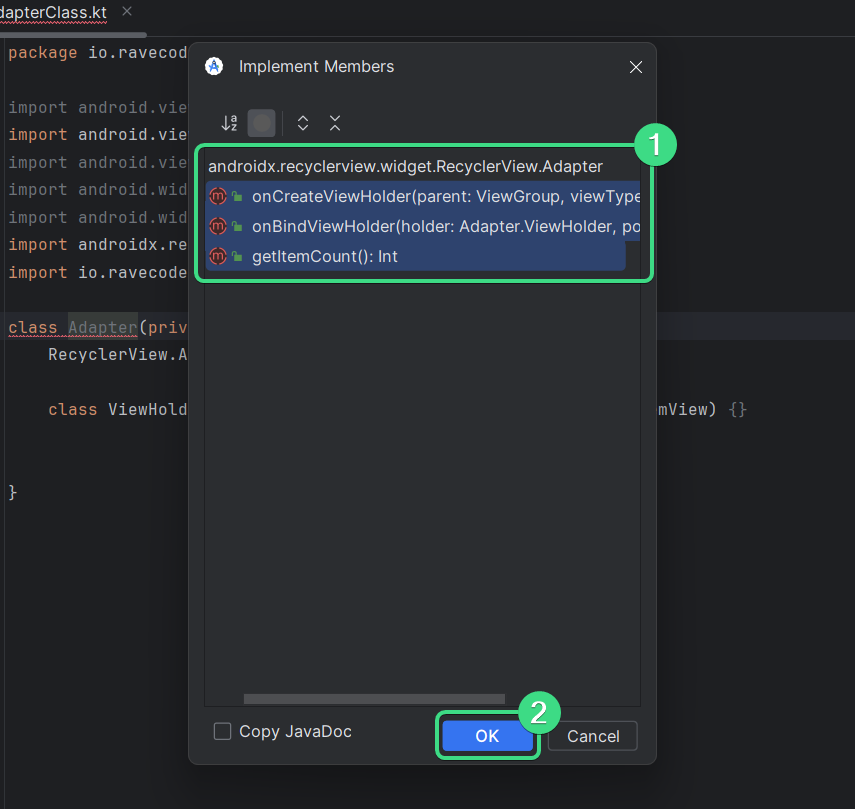
Select all three functions and click on “OK”.
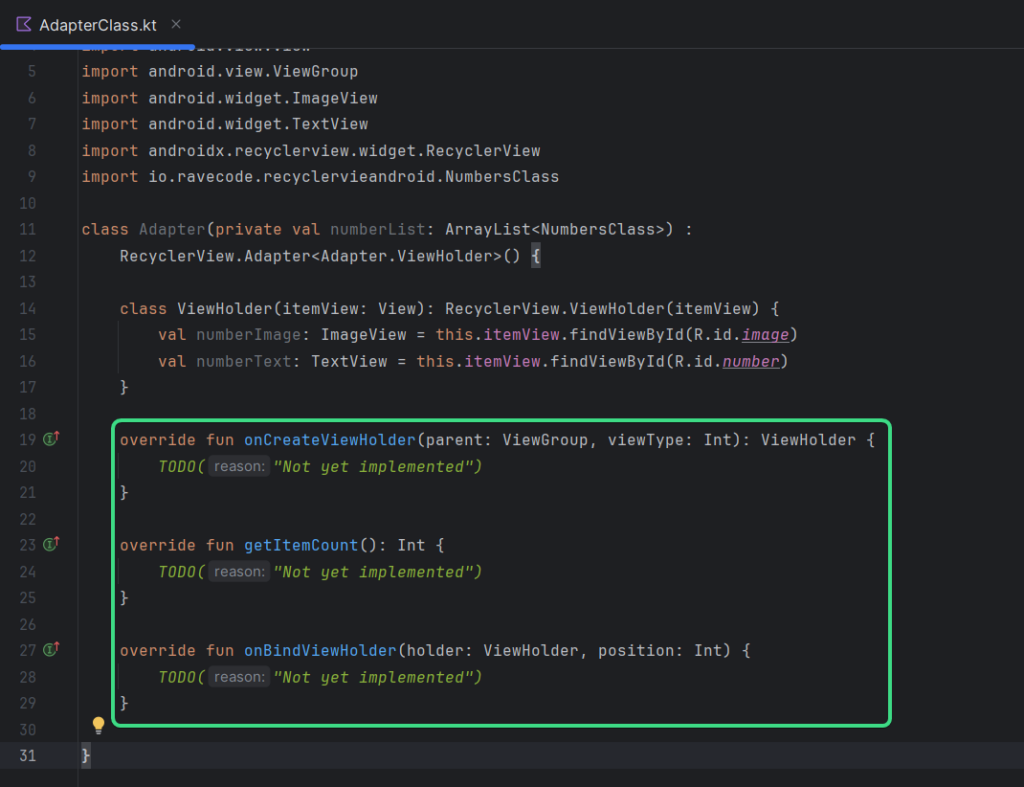
You will see all three functions added to your Adapter class.
We will inflate the layout we created for the RecyclerView item in step 4 to onCreateViewHolder() function with the following code:
val itemView = LayoutInflater.from(parent.context).inflate(R.layout.item_layout, parent, false)
        return ViewHolder(itemView)
We need to return the number of items we want to show in the getItemCount() function. Furthermore, we will show the items of numberList array, so we will return its size with the following code.
return numberList.sizeNow we need to set where the data from numberList will be displayed in onBindViewHolder(). We will select the numberImage data to be displayed on the ImageView of item_layout. So we will set that using the ID if the ImageView and do the same for the numberText using the following code.
val currentItem = numberList[position]
        holder.numberImage.setImageResource(currentItem.numberImage)
        holder.numberText.text = currentItem.numberText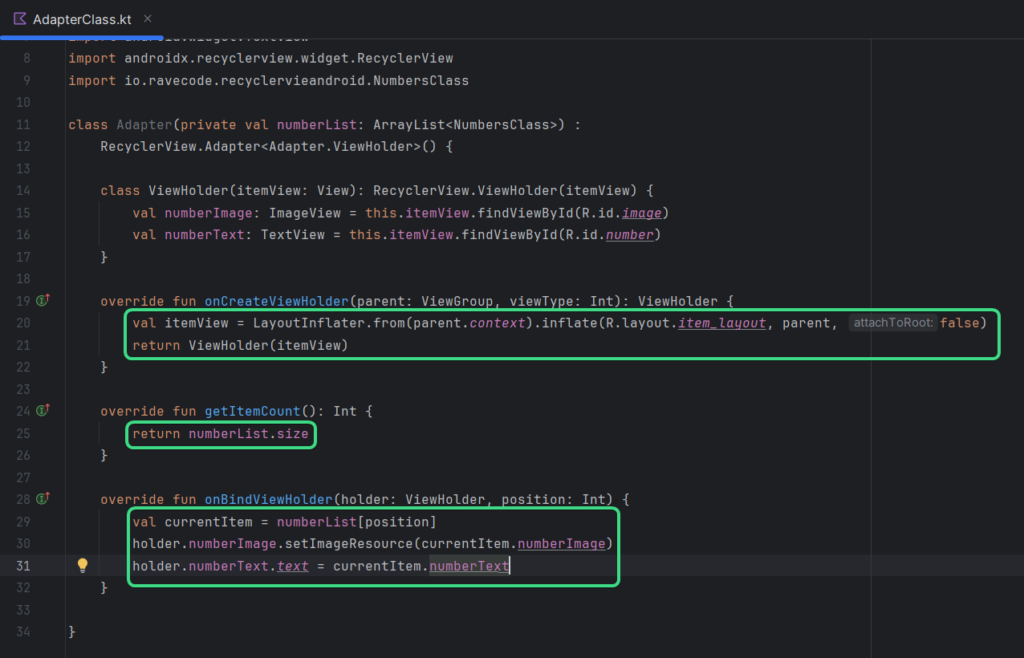
7. Coding the MainActivity
7.1 Initialize and create the variable
At the beginning of the class, we will initialize and create the required variable with the following code.
private lateinit var recyclerView: RecyclerView
    private lateinit var numbersList: ArrayList<NumbersClass>
    lateinit var imageList: Array<Int>
    lateinit var titleList: Array<String>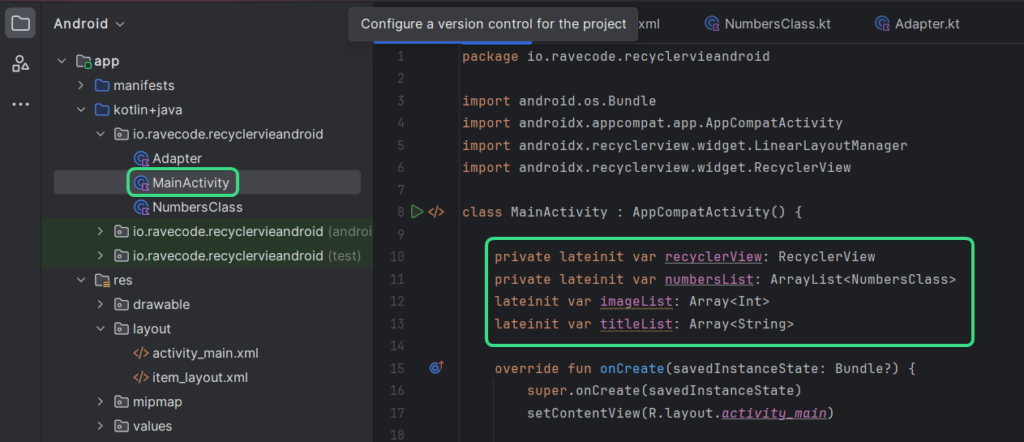
7.2 Get data from arrays
We need to create a function named getData() which takes the array of numbers in words and the array of int values of the images and add as a NumbersClass data to the numberList ArrayList. We will show the data of numberList ArrayList in the RecyclerView.
private fun getData(){
        for (i in imageList.indices){
            val numberClass = NumbersClass(imageList[i], titleList[i])
            numbersList.add(numberClass)
        }

        recyclerView.adapter = Adapter(numbersList)
    }
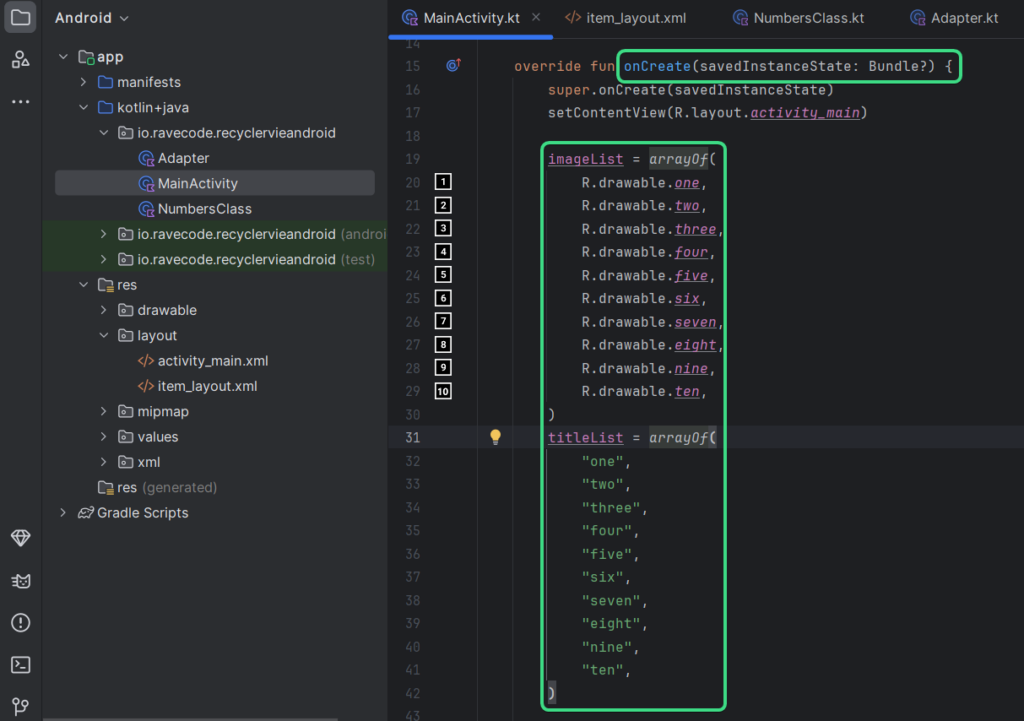
7.3 Create the arrays with numbers and images
Now we will create the arrays of int value of images and the numbers which we will provide to getData().
imageList = arrayOf(
            R.drawable.one,
            R.drawable.two,
            R.drawable.three,
            R.drawable.four,
            R.drawable.five,
            R.drawable.six,
            R.drawable.seven,
            R.drawable.eight,
            R.drawable.nine,
            R.drawable.ten,
        )
        titleList = arrayOf(
            "one",
            "two",
            "three",
            "four",
            "five",
            "six",
            "seven",
            "eight",
            "nine",
            "ten",
        )
7.3 Setting up RecyclerView
We will find the RecyclerView with findViewById() and we will set it to show the items in a Linear Layout. Next, we will set it as with a fixed size of data. Here is the code for that.
recyclerView = findViewById(R.id.recyclerView)
        recyclerView.layoutManager = LinearLayoutManager(this)
        recyclerView.setHasFixedSize(true)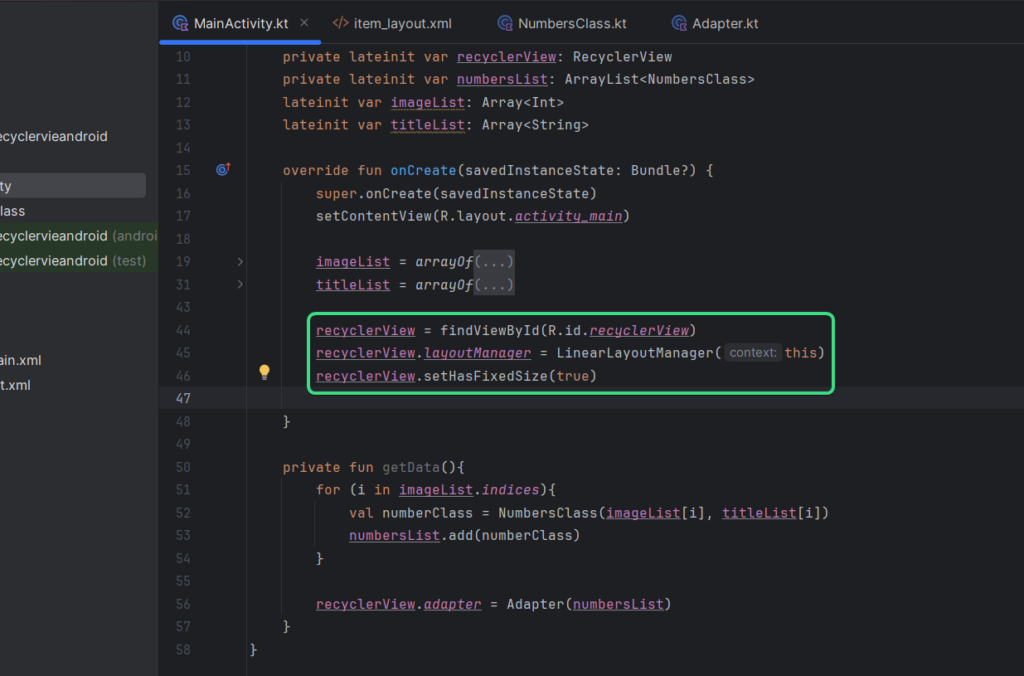
7.4 Initialize the NumbersList array and call GetData()
Now we will initialize the numberList ArrayList which will hold the data we would like to show it on the RecyclerView. We will call the getData() function which will add the NumbersClass data to numberList.
numbersList = arrayListOf()
        getData()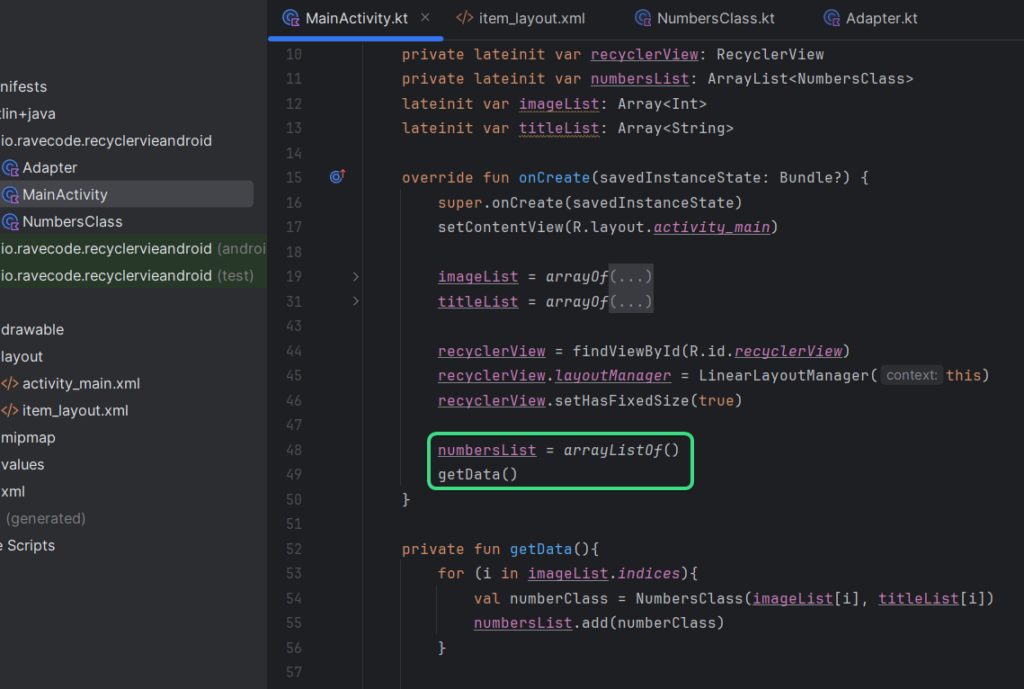
8. Test the app
Now our app is ready to test. Connect your Android device and test if it’s working.
Learn more: Create dynamic lists with RecyclerView
Related posts:
How to connect Firebase with Android Studio App
Leave a Reply