In this blog, we’ll explore how to build a one-on-one chat app using the ZEGOCLOUD UIKITs in Android Studio. You’ll learn how to set up your development environment, integrate real-time communication features, and create a user-friendly messaging experience. Let’s dive in and bring your chat app idea to life!
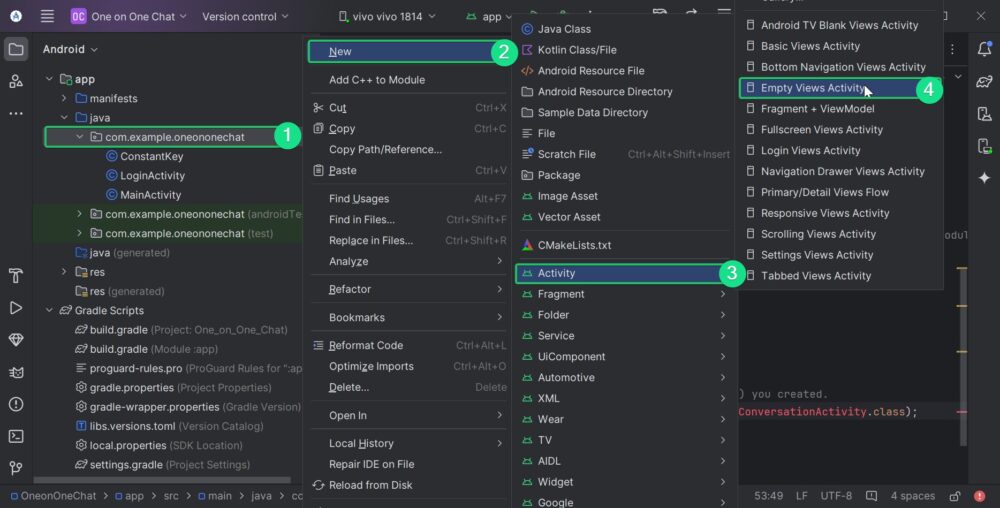
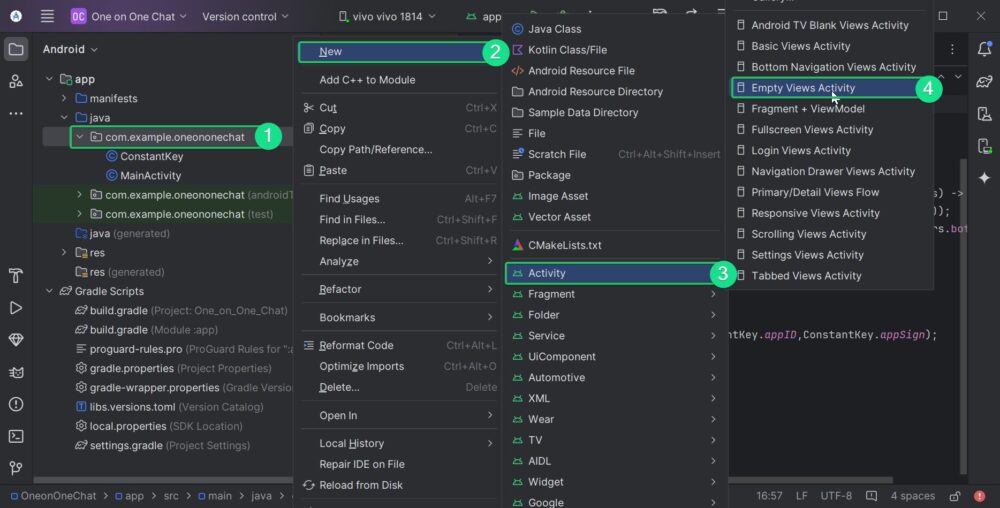
Step 1: Create a New Project in Android Studio
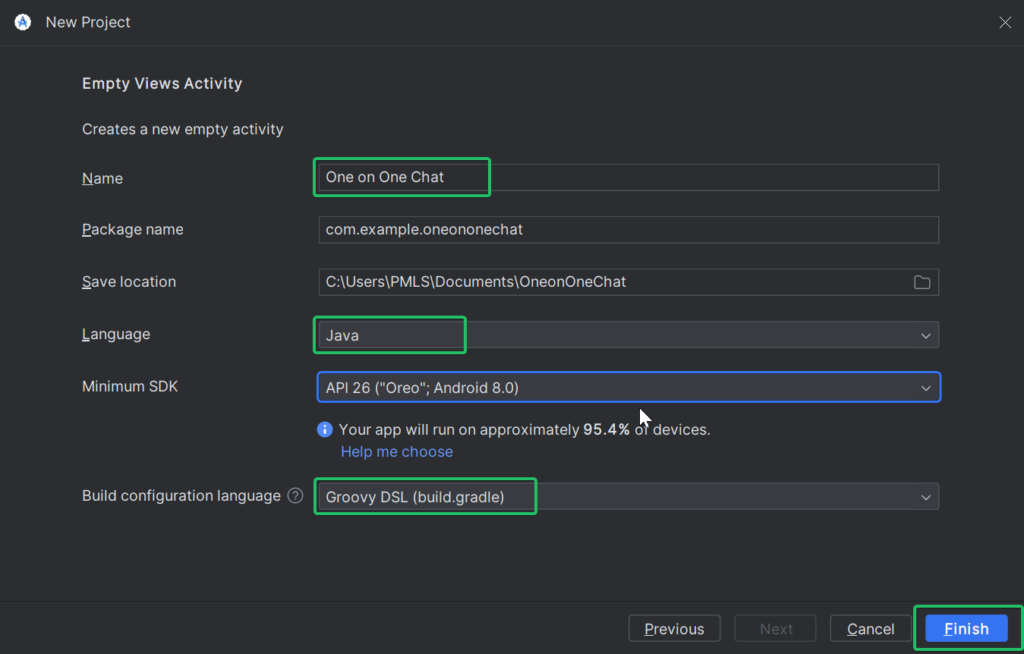
- Open Android Studio and select “New Project”.
- Choose “Empty Views Activity” and name your project.
- Select
Javaas class andGroovyas language. - Click “Finish” to generate the project.
Step 2: Set Up a Project in ZEGOCLOUD
Go to the ZEGOCLOUD website and log in or sign up.
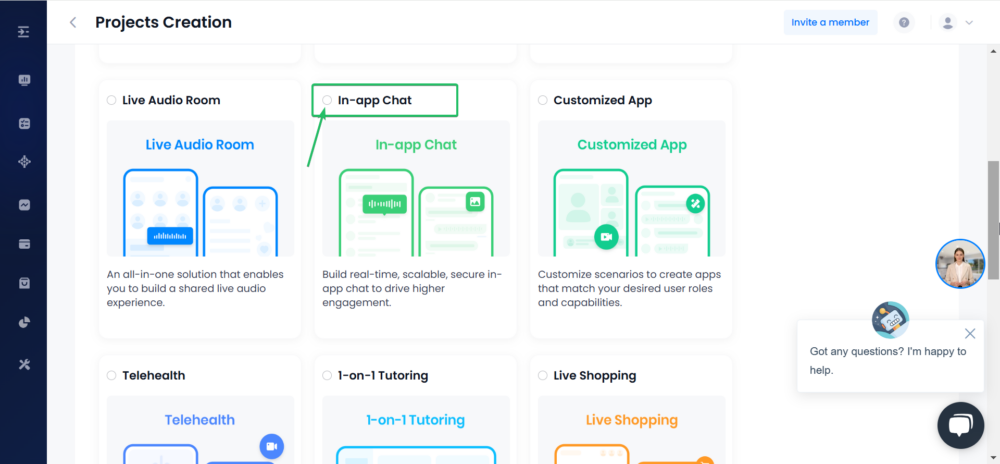
Create a new project:
- Select “In-App Chat”.
- Name your project and finish the setup.
You will receive appID and appSign values for authentication.

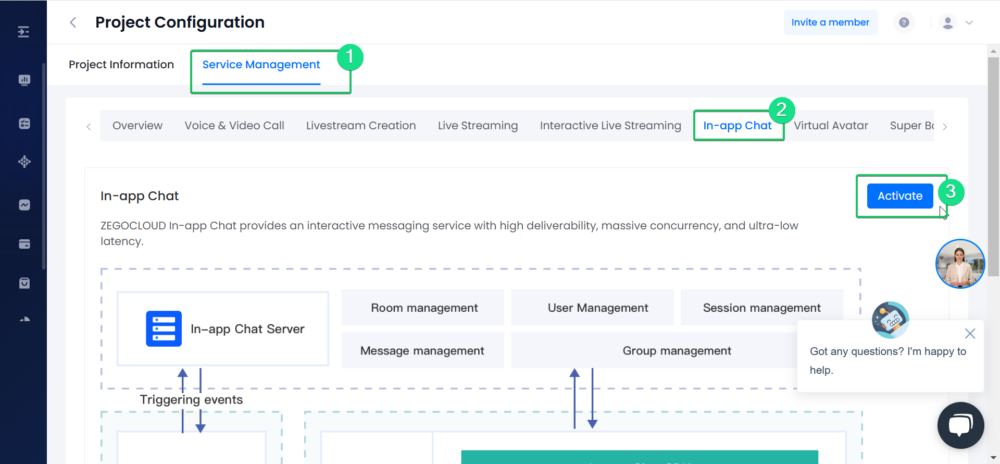
Step 3: Activate In-App Chat Service on ZEGOCLOUD
- Go to “Service Management” in the ZEGOCLOUD console dashboard.
- Under “In-App Chat,” click “Activate” and then “Ready to activate” to enable the chat service.
Step 4: Add ZEGOCLOUD App Credentials in Android Studio
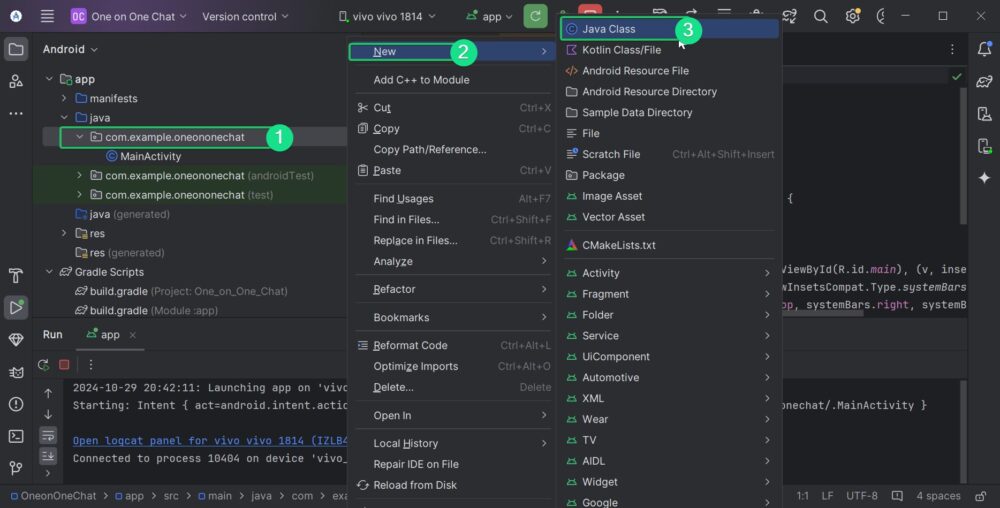
- In Android Studio, create a new
Java class:
- Right-click your package >
New>Java Class. - Name it
ConstantKey.
2. Use the following code to store the appID and appSign provided by ZEGOCLOUD.
public static long appID = ;
    public static String appSign = "";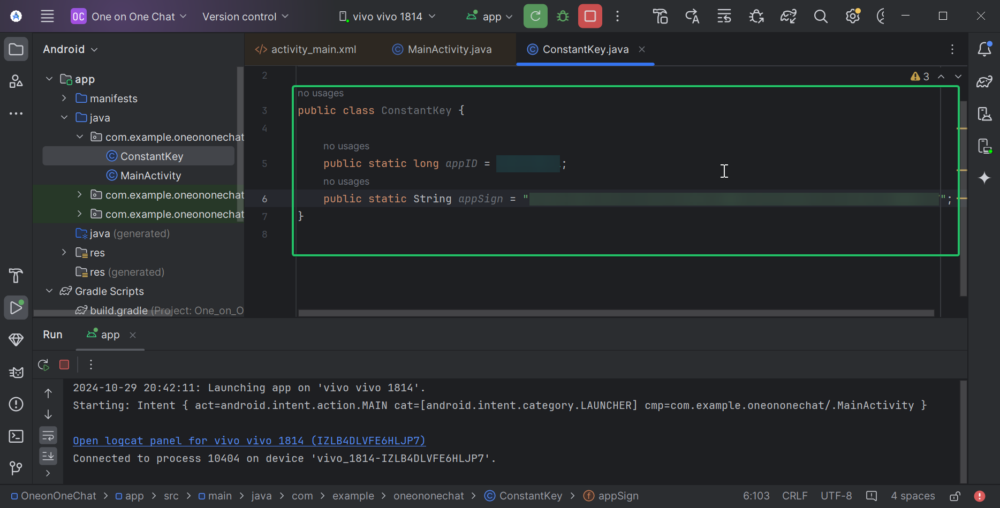
Step 5: Add SDK Dependencies
Open your project’s settings.gradle file, add the JitPack and ZEGOCLOUD repositories, and sync your project.
maven { url 'https://storage.zego.im/maven' }
        maven { url 'https://www.jitpack.io' }
Step 6: Enable Jetifier in Gradle Properties
In the gradle.properties file, enable the jetifier, and sync the project.
android.enableJetifier=true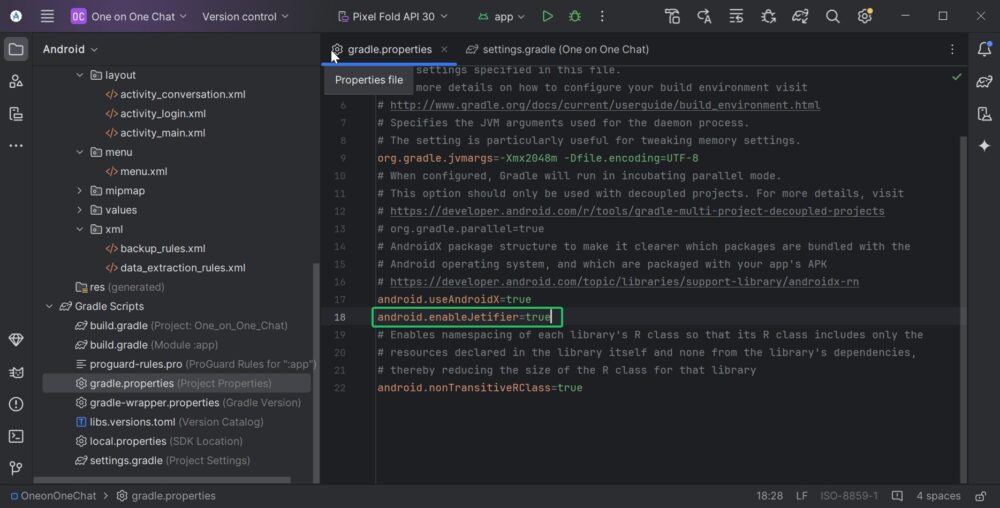
Step 7: Configure App-Level Gradle File
In build.gradle (app-level), enable DataBinding.
buildFeatures {
        dataBinding true
    }
Add the In-App Chat SDK dependency and sync the project.
implementation 'com.github.ZEGOCLOUD:zego_inapp_chat_uikit_android:+'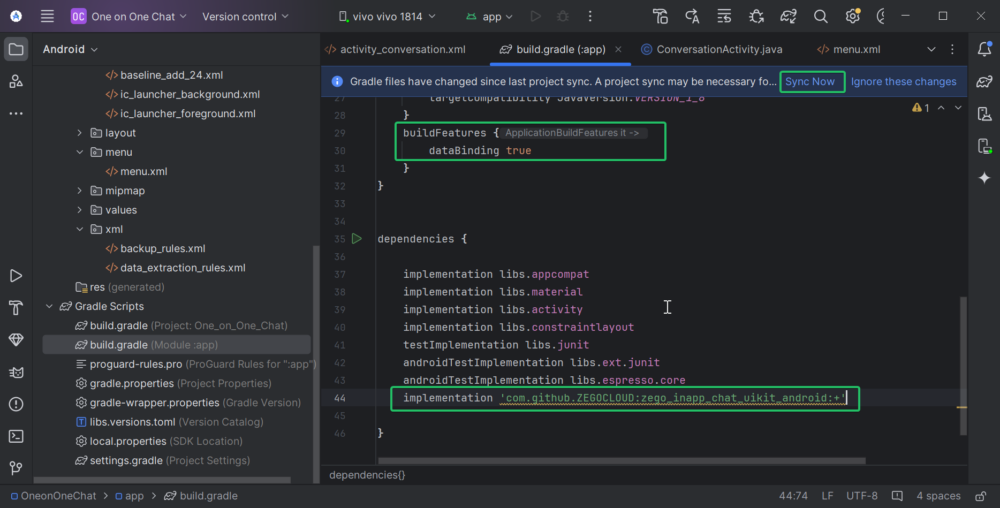
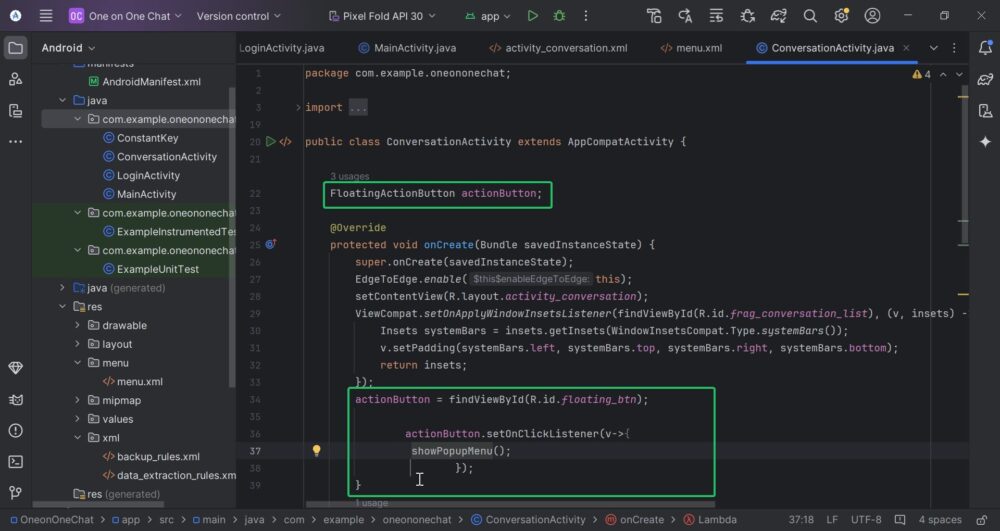
Step 8: Initialize the In-App Chat Kit
Create a method initZegocloud() in your main activity and add the following code.
public void initZegocloud(){
        ZIMKit.initWith(this.getApplication(),ConstantKey.appID,ConstantKey.appSign);
        ZIMKit.initNotifications();
    }
Step 9: Create LoginActivity
- Right-click the package >
New>Empty Views Activity. - Name the activity
LoginActivity.
Step 10: Design the Login Layout
- Open
activity_login.xmland design it with a verticalLinearLayoutand centered gravity. - Add
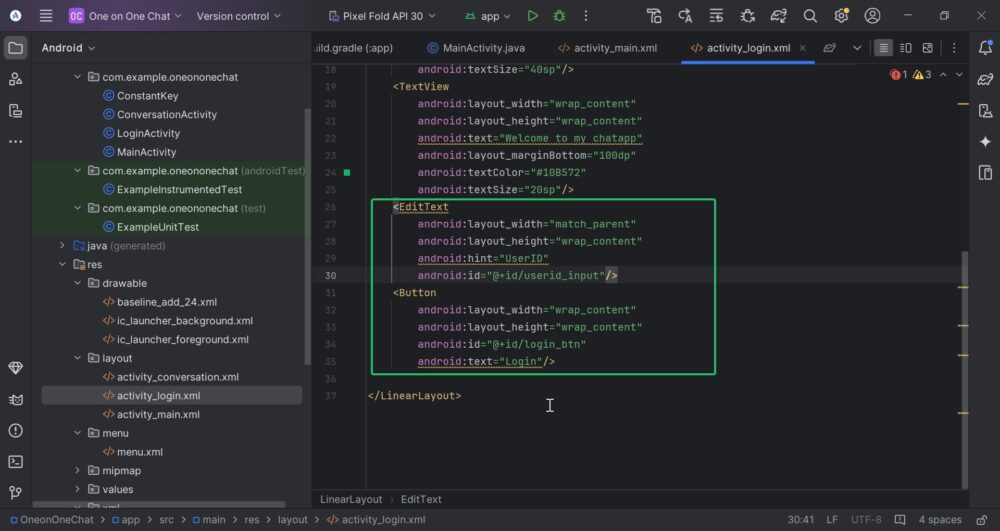
TextViewsfor the app name and welcome text. - Add an
EditTextand a Button for user login.
<?xml version="1.0" encoding="utf-8"?>
<LinearLayout xmlns:android="http://schemas.android.com/apk/res/android"
    xmlns:app="http://schemas.android.com/apk/res-auto"
    xmlns:tools="http://schemas.android.com/tools"
    android:id="@+id/main"
    android:layout_width="match_parent"
    android:layout_height="match_parent"
    android:gravity="center"
    android:orientation="vertical"
    android:padding="16dp"
    tools:context=".LoginActivity">

    <TextView
        android:layout_width="wrap_content"
        android:layout_height="wrap_content"
        android:text="@string/app_name"
        android:textColor="#10B572"
        android:textSize="40sp"/>
    <TextView
        android:layout_width="wrap_content"
        android:layout_height="wrap_content"
        android:text="Welcome to my chatapp"
        android:layout_marginBottom="100dp"
        android:textColor="#10B572"
        android:textSize="20sp"/>
    <EditText
        android:layout_width="match_parent"
        android:layout_height="wrap_content"
        android:hint="UserID"
        android:id="@+id/userid_input"/>
    <Button
        android:layout_width="wrap_content"
        android:layout_height="wrap_content"
        android:id="@+id/login_btn"
        android:text="Login"/>

</LinearLayout>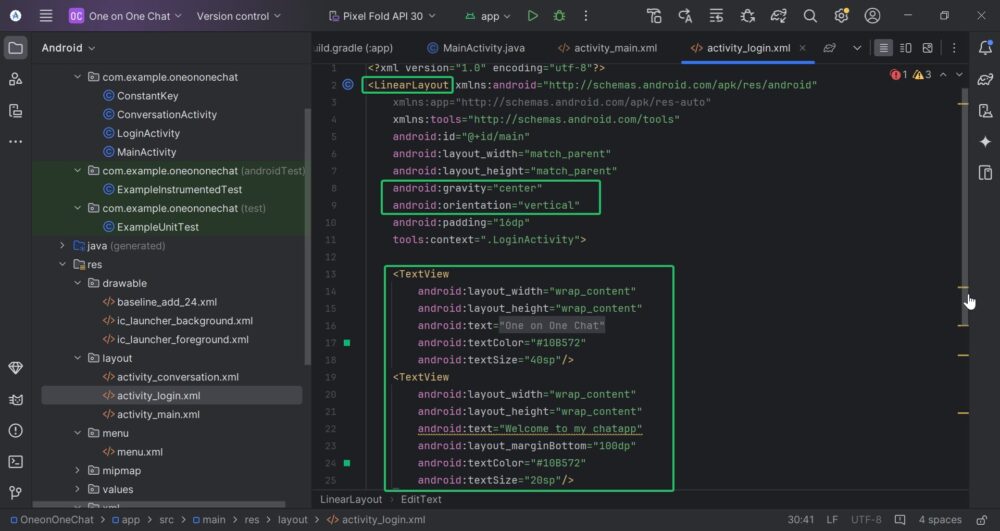
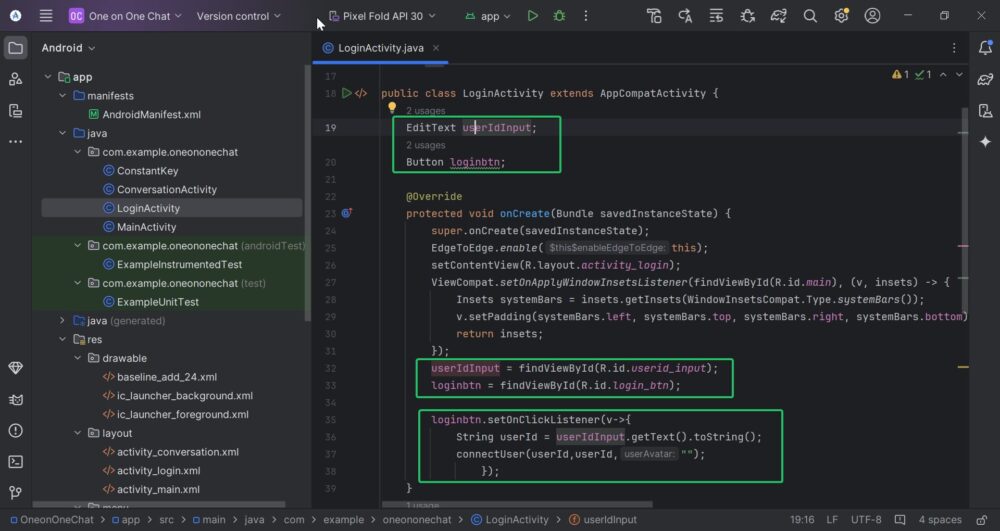
Step 11: Set Up Login Logic in LoginActivity
In your LoginActivity.java bind the EditText and Button:
userIdInput = findViewById(R.id.userid_input);
loginbtn = findViewById(R.id.login_btn);
Add an onClickListener to log in the user:
loginbtn.setOnClickListener(v->{
String userId = userIdInput.getText().toString();
connectUser(userId,userId,"");
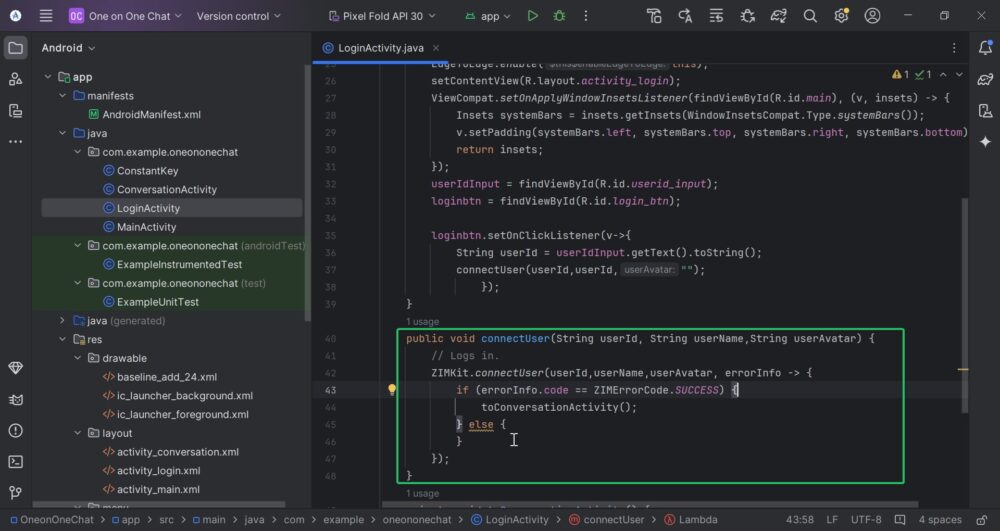
});Create methodconnectUser() to log into ZEGOCLOUD’s In-App Chat:
- User Login: Calls
ZIMKit.connectUserto log in withuserId,userName, anduserAvatar.
2. Handle Login Success:
- Checks if
errorInfo.codeequalsZIMErrorCode.SUCCESS. - On success, redirects to the conversation module by calling
toConversationActivity().
public void connectUser(String userId, String userName,String userAvatar) {
        // Logs in.
        ZIMKit.connectUser(userId,userName,userAvatar, errorInfo -> {
            if (errorInfo.code == ZIMErrorCode.SUCCESS) {
                // Operation after successful login. You will be redirected to other modules only after successful login. In this sample code, you will be redirected to the conversation module.
                toConversationActivity();
            } else {
            }
        });
    }
Step 12: Create a Conversation Activity
Right-click your package > New > Empty Views Activity.
Name it ConversationActivity.
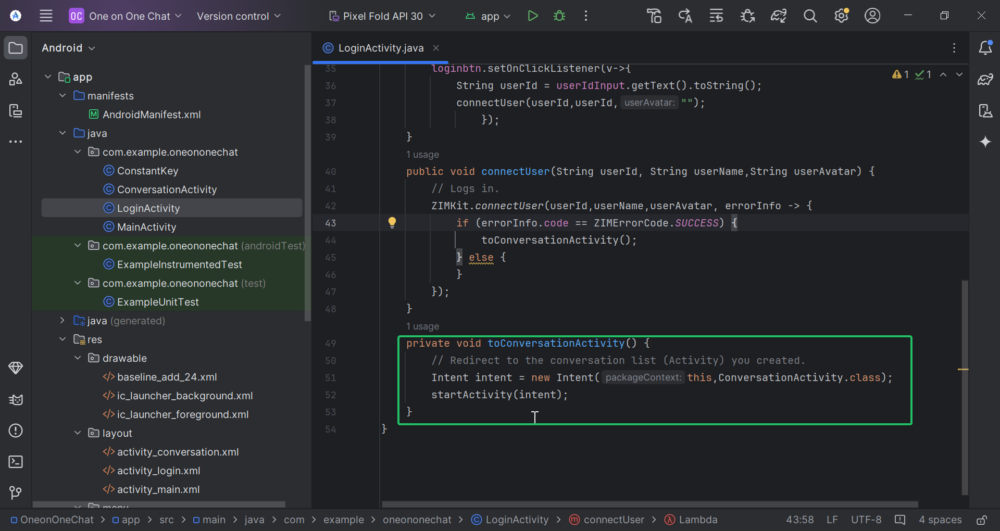
Step 13: Create a Method in LoginActivity to Navigate to ConversationActivity
- Intent Creation: Creates an
Intentto navigate toConversationActivity. - Redirect to Activity: Calls
startActivity(intent)to open theConversationActivityscreen.
private void toConversationActivity() {
        // Redirect to the conversation list (Activity) you created.
        Intent intent = new Intent(this,ConversationActivity.class);
        startActivity(intent);
    }
Step 14: Start LoginActivity in MainActivity
In your MainActivity, start the LoginActivity:
 startActivity(new Intent(this,LoginActivity.class));
        finish();
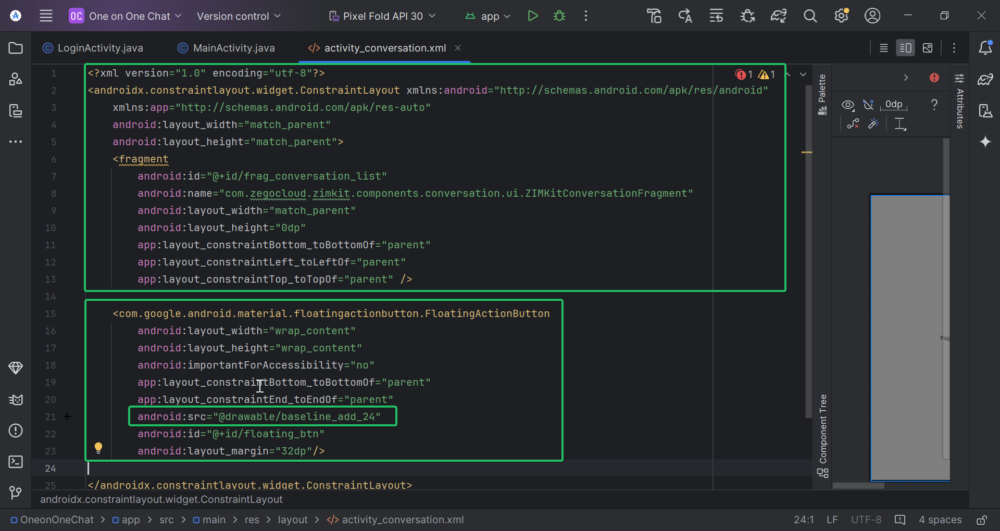
Step 15: Design Conversation Layout
Open activity_conversation.xml and add a ZEGOCLOUD fragment for the conversation list:
<?xml version="1.0" encoding="utf-8"?>
<androidx.constraintlayout.widget.ConstraintLayout xmlns:android="http://schemas.android.com/apk/res/android"
    xmlns:app="http://schemas.android.com/apk/res-auto"
    android:layout_width="match_parent"
    android:layout_height="match_parent">

    <fragment
        android:id="@+id/frag_conversation_list"
        android:name="com.zegocloud.zimkit.components.conversation.ui.ZIMKitConversationFragment"
        android:layout_width="match_parent"
        android:layout_height="0dp"
        app:layout_constraintBottom_toBottomOf="parent"
        app:layout_constraintLeft_toLeftOf="parent"
        app:layout_constraintTop_toTopOf="parent" />

</androidx.constraintlayout.widget.ConstraintLayout>
Add a Floating Action Button for creating new chats:
<com.google.android.material.floatingactionbutton.FloatingActionButton
android:layout_width="wrap_content"
android:layout_height="wrap_content"
android:importantForAccessibility="no"
app:layout_constraintBottom_toBottomOf="parent"
app:layout_constraintEnd_toEndOf="parent"
android:src="@drawable/baseline_add_24"
android:id="@+id/floating_btn"
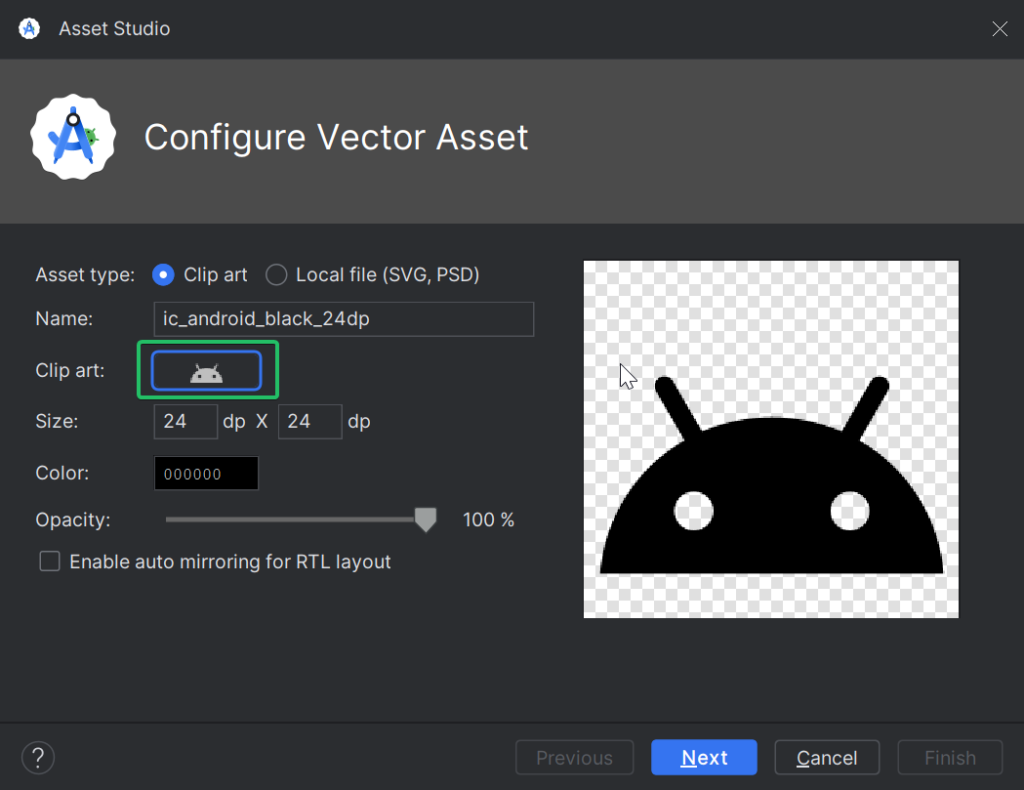
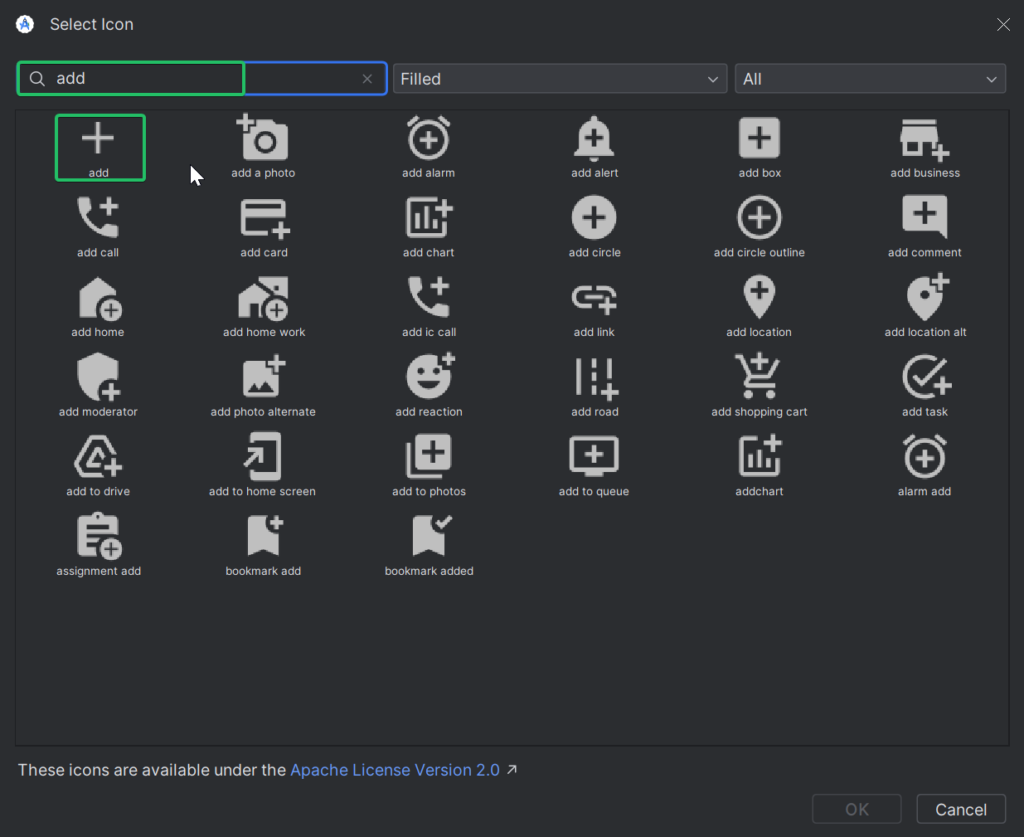
android:layout_margin="32dp"/>- To add a vector asset of the ‘add’ (+) icon, right-click on the drawable folder within the res directory.
- Go to
New>Vector Asset - Select the ‘add’ icon from the library
- Click Finish to save it.

Step 16: Bind the actionButton and set an onClickListener in ConversationActivity
actionButton = findViewById(R.id.floating_btn);

                actionButton.setOnClickListener(v->{
showPopupMenu();
                        });
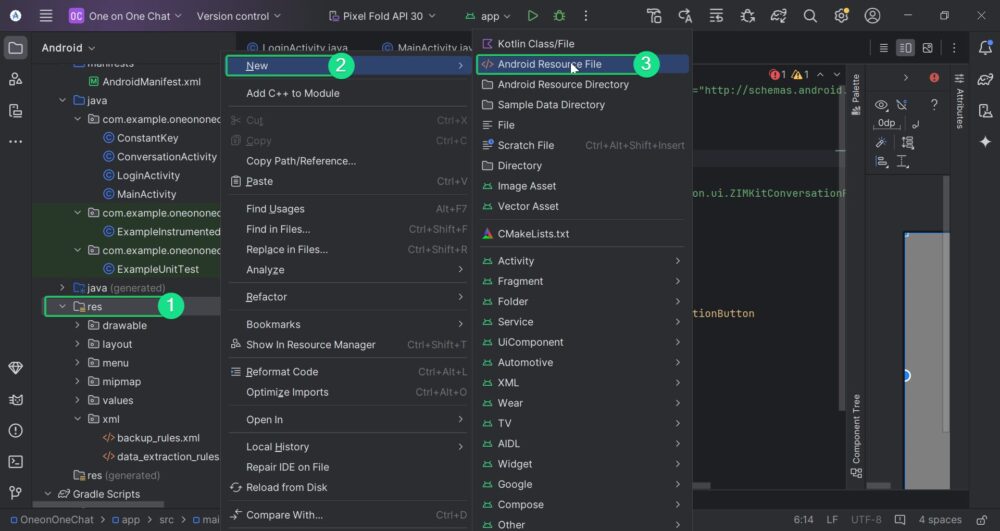
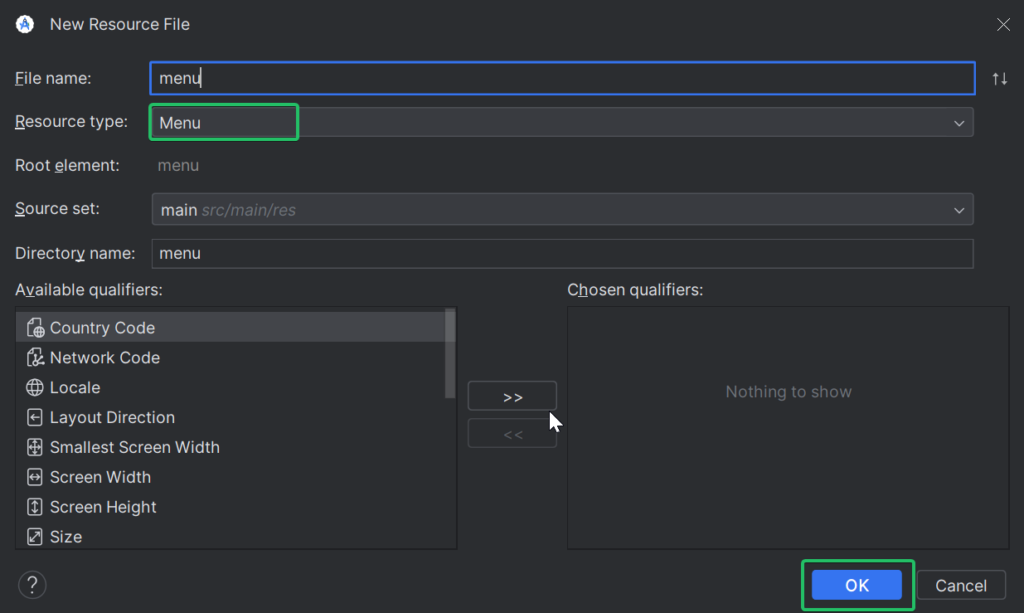
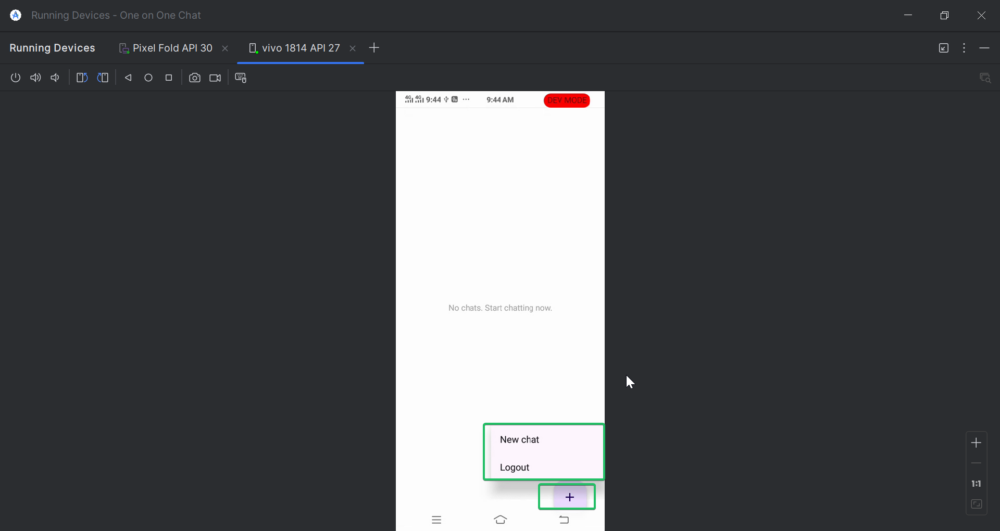
Step 17: Add Menu for New Chat and Logout
- Create a new menu XML file (
menu.xml) in res. - Right-click on the menu >
New> Android resource file. - Name it and choose the resource type
menu.
Add New chat and Logout items in menu.xml.
- Define Menu Items: Specifies two items for a popup or options menu.
2. New Chat Item:
title: Displays “New chat”.id:@+id/new_chat, used to identify and handle this item in code.
3. Logout Item:
title: Displays “Logout”.id:@+id/logout, used to identify and handle this item in code.
<item android:title="New chat"
     android:id="@+id/new_chat"/>
    <item android:title="Logout"
        android:id="@+id/logout"/>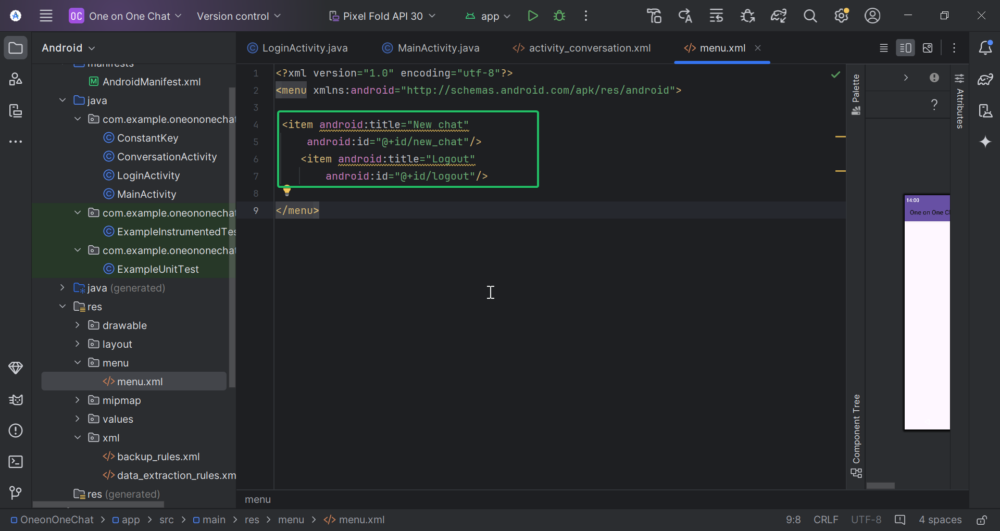
Step 17: Implement Menu and New Chat Dialog in ConversationActivity
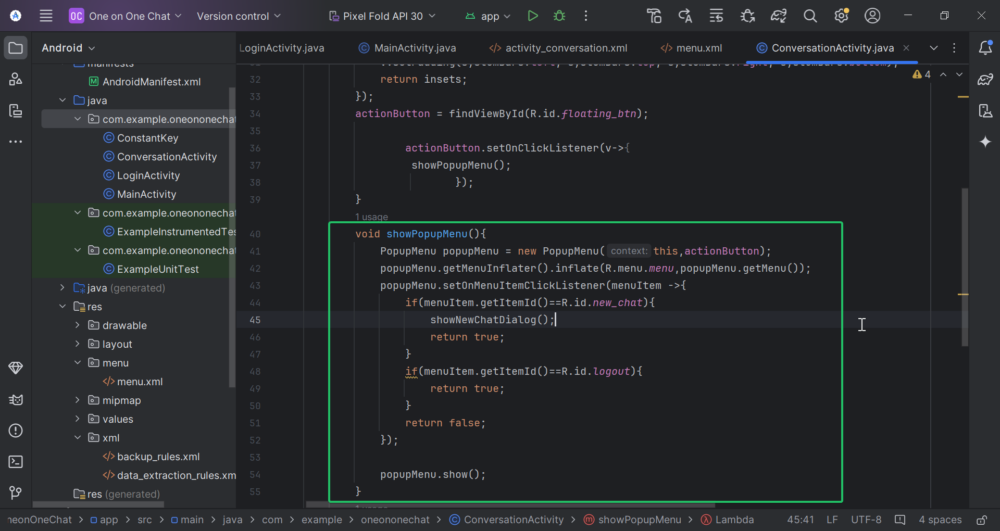
Create a showPopupMenu() method:
- Initialize Popup Menu: Creates a
PopupMenuinstance, anchored toactionButton. - Inflate Menu: Loads a menu layout (
R.menu.menu) into the popup menu. - Handle Item Clicks: Sets an
OnMenuItemClickListenerto respond to item selections:
- New Chat: Calls
showNewChatDialog(). - Logout: Returns
trueto indicate selection.
4. Display Popup: Uses popupMenu.show() to display the popup on the screen.
void showPopupMenu(){
            PopupMenu popupMenu = new PopupMenu(this,actionButton);
            popupMenu.getMenuInflater().inflate(R.menu.menu,popupMenu.getMenu());
            popupMenu.setOnMenuItemClickListener(menuItem ->{
                if(menuItem.getItemId()==R.id.new_chat){
                    showNewChatDialog();
                    return true;
                }
                if(menuItem.getItemId()==R.id.logout){
                    return true;
                }
                return false;
            });

            popupMenu.show();
        }
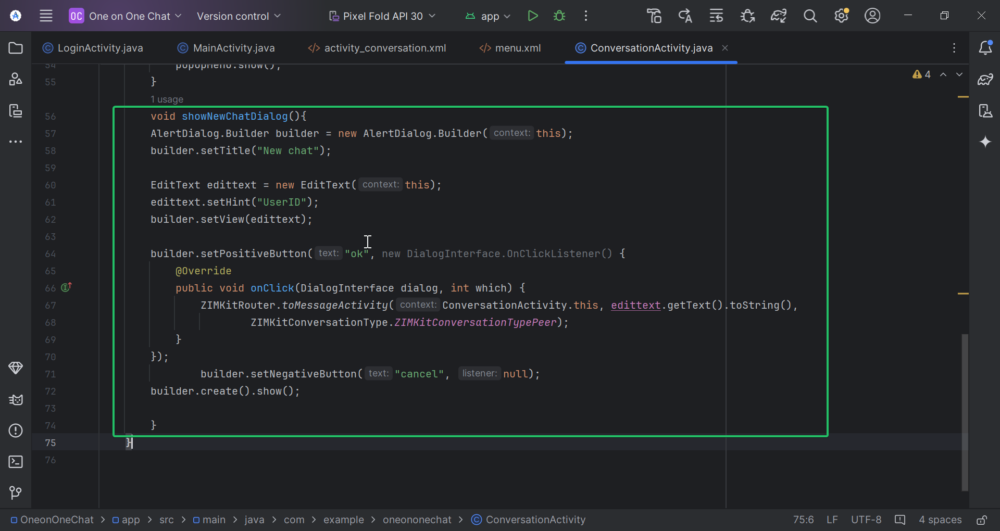
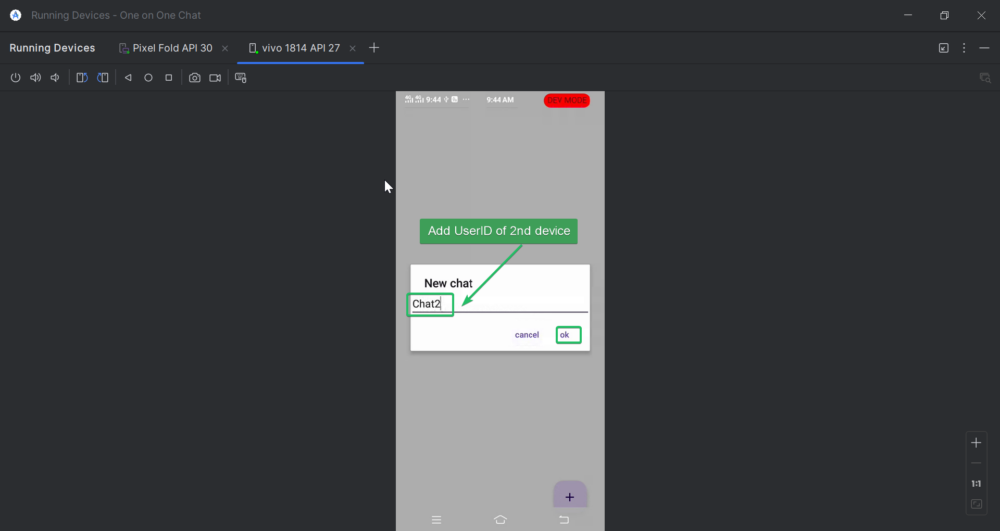
Create showNewChatDialog():
- Initialize AlertDialog: Creates an
AlertDialog.Builderwith the title “New chat”.
2. Set Up Input Field: Adds an EditText for user input, with a hint "UserID".
3. Add Positive Button:
- OK: Retrieves user input and navigates to the chat screen (
toMessageActivity) with the enteredUserID.
4. Add Negative Button:
- Cancel: Dismisses the dialog without any action.
5. Show Dialog: Calls create().show() to display the dialog to the user.
void showNewChatDialog(){
        AlertDialog.Builder builder = new AlertDialog.Builder(this);
        builder.setTitle("New chat");

        EditText edittext = new EditText(this);
        edittext.setHint("UserID");
        builder.setView(edittext);

        builder.setPositiveButton("ok", new DialogInterface.OnClickListener() {
            @Override
            public void onClick(DialogInterface dialog, int which) {
                ZIMKitRouter.toMessageActivity(ConversationActivity.this, edittext.getText().toString(),ZIMKitConversationType.ZIMKitConversationTypePeer);
            }
        });
                builder.setNegativeButton("cancel", null);
        builder.create().show();

        }
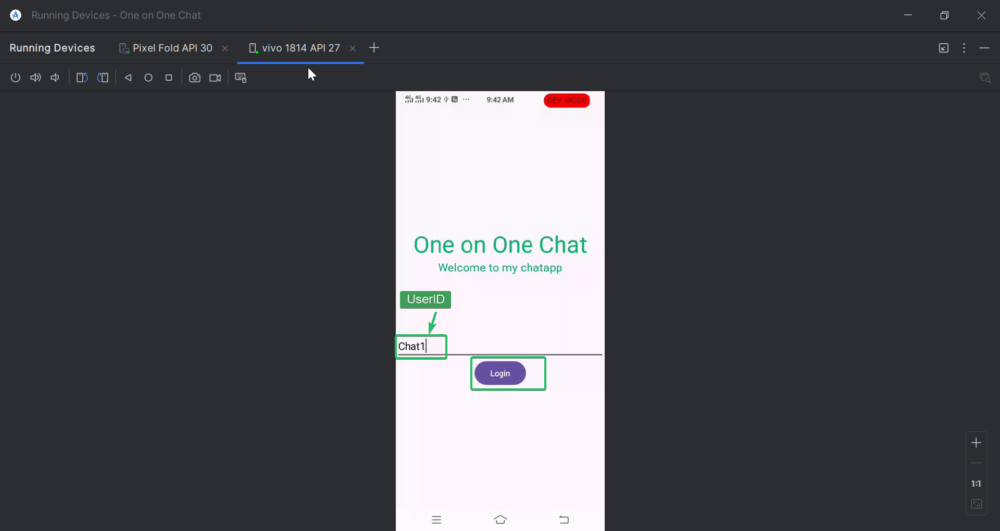
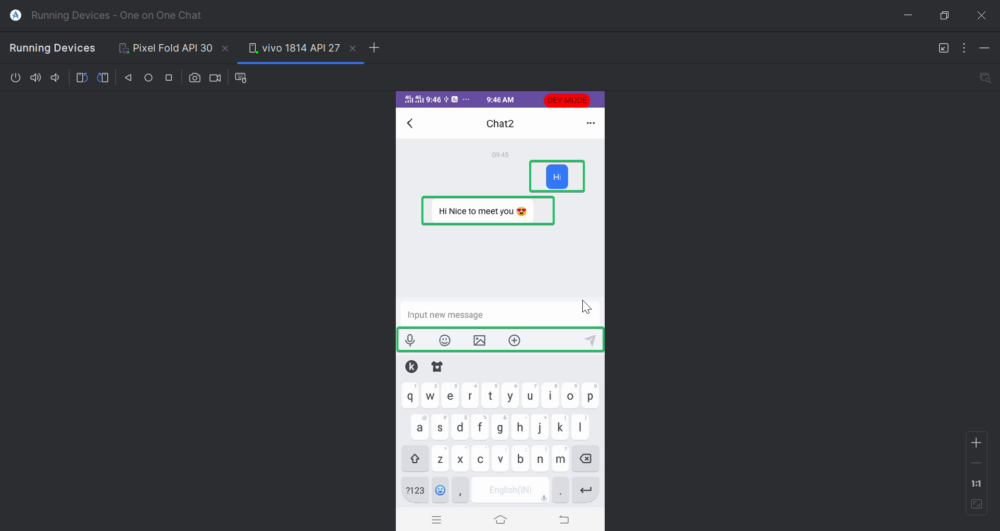
Step 19: Test Your Application
Run the app on two devices, log in with a user ID, and start chatting.
Thank you for following along in our journey to build a one-on-one chat app with the ZEGOCLOUD SDK! We hope this guide has provided valuable insights and practical skills to create a seamless messaging experience.
Happy coding, and enjoy your development adventure!
Leave a Reply